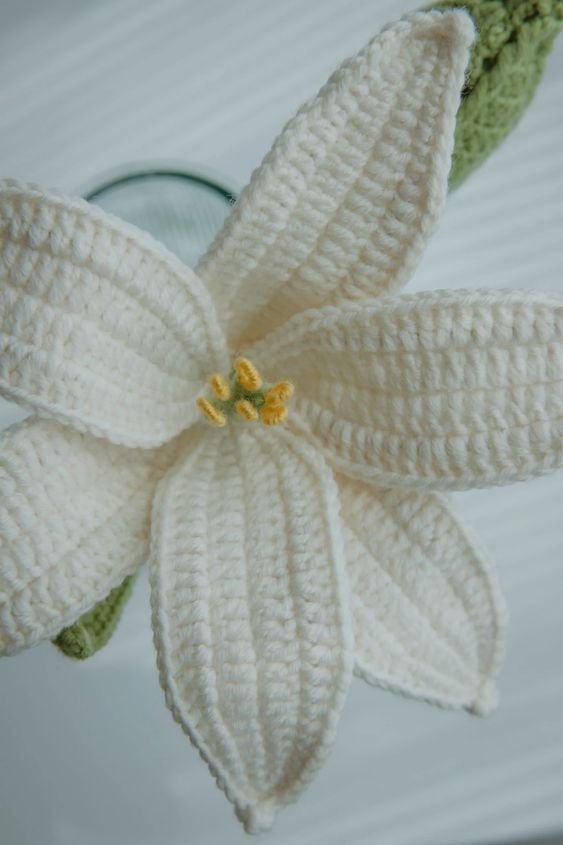
Repeat same pattern on the other side
Finish with ss, cut yarn, and leave a long tail for wrapping
Repeat to make six petals.
🌱 Flower Bud (Make 1)
Using green yarn:
R1: MR, ch3, 5 dc in ring, ss in top of ch3
R2: ch3, (dc, 2dc in next st) x2, 2dc in each st, ss
R3: ch3, (fpdc, 2dc in next st) x4, ss
R4: ch3, (fpdc, dc, 2dc in next st) x4, ss
R5: ch3, (fpdc, 2dc, 2dc in next st) x4, ss
R6: ch3, (fpdc, 3dc, 2dc in next st) x4, ss
R7–R9: ch3, (fpdc, 5dc) x4, ss
R10: ch3, (fpdc, 3dc, dc2tog) x4, ss
R11: ch3, (fpdc, 2dc, dc2tog) x4, ss
R12: ch3, (fpdc, dc, dc2tog) x4, ss
R13: ch3, (fpdc, dc2tog) x4, ss
Add polyfill stuffing
R14: ch3, (dc, dc2tog)
Insert bent flower stem into bud
(dc, dc2tog), dc2tog, ss, ch1
Cut and leave tail for wrapping
🍃 Leaf (Make 1)
Foundation Chain: 30 ch
R1:
Add iron wire
2 sc into 2nd ch from hook
hdc 2, dc 20, hdc 2, sc 2
3 sc in last st
Working on other side: sc 2, hdc 2, dc 20, hdc 2, sc 2, ss
R2:
ch1, sc 30, 2 ch picot st, sc 29, ss
Cut and leave long tail
✂️ Stamen (Make 5)
Cut 15 cm (6 in) iron wire
From 5 cm mark, wrap 2.5 cm (1 in) in yellow yarn
Fold wire in half, aligning yellow ends
Wrap green yarn around double wire for 2.5 cm
Cut and knot to secure
🧵 Final Assembly
🧿 For visual learners, we recommend watching the video tutorial that demonstrates each step clearly.
Prepare the Stem
Cut the metal rod in half
Wrap stamens around one half using green yarn
Secure tail with hot melt adhesive
Attach Petals
Wrap each petal one by one onto the stem, securing them tightly with yarn
Continue wrapping to cover all tail ends
Add Leaf and Bud
Attach the leaf using the tail and wrap around the stem
Add the flower bud last, finishing the wrap and securing with hot glue
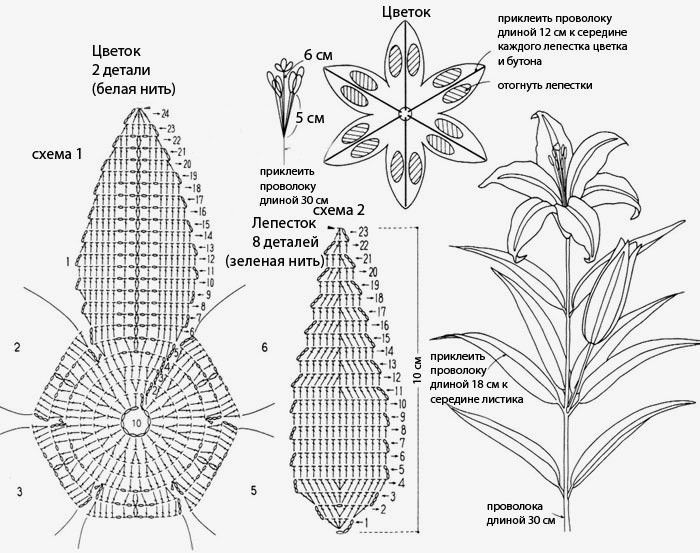
Diagram
🌼 Make Your Crochet Garden Bloom
Now you’ve completed your elegant crochet lily flower, a timeless piece that adds grace to any space. Whether placed in a vase, added to a bouquet, or gifted to a loved one, this crochet lily is a beautiful token of craftsmanship and care.
Ready to bring more flowers to life? Stay tuned for more crochet botanical patterns and inspiration here on My Crafts Ideas!