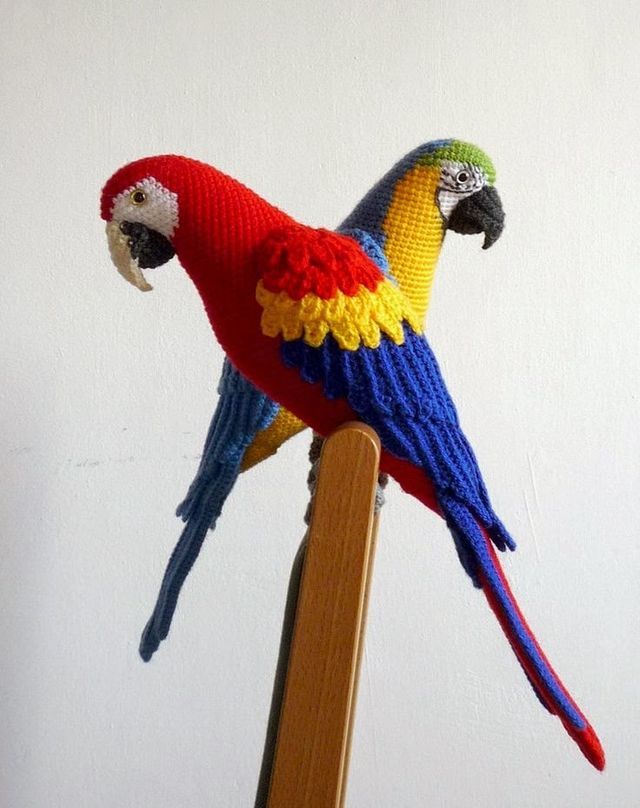
Image 1
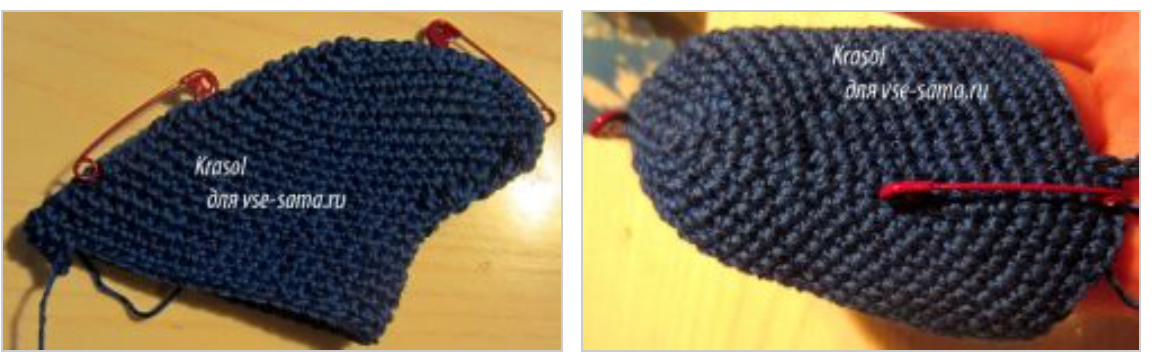
beginning of parrot body
Row 16 – 37 sc, sc inc
Row 17 – 37 sc, sc inc, 2 sc
Row
18 – 2 sc, sc inc, 30 sc, sc inc, 6 sc
Row
19 – 39 sc, sc inc, 2 sc
Row 20 – 16 sc, 1 dec, 22 sc, sc inc, 2 sc
Row 21 – 40 sc, sc inc, 2 sc
Row 22 – 41 sc, sc inc, 2 sc
Now you can stuff the body part with stuffing for soft toys.
gradually fill in the body
Row 23 – 43 sts, inc sts, 1 st
Row 24 – 44 sts, inc sts, 1 st
Row 25 – 45 sts, inc sts, 1 st
Row 26 – 47 sts, inc sts, 1 st
Row 27 – 21 sts, inc sts, 25 sts, inc sts, 1 st
Row 28 – 50 sts, inc sts
Row 29 – 19 sts, inc sts, 11 sts, inc sts, 20 sts, inc sts, 2 sts
Row 30 – 52 sts, inc sts, 2 sts
Row 31 – 54 sts, inc sts, 1 sts
Row 32 – 56 sts, inc sts
Rows 33, 34 – 58 sts each
Row 35 – 22 ssc, 1 dec, 11 ssc, 1 dec, 22 ssc, inc sts, 2 ssc
36 – 55 ssc, inc sts, 1 s/sc
Row 37 – 18 s/sc, 1 dec, 13 s/sc, 1 dec , 22 s/ inc s/sc, 1 sc , 1 sc
3 – 13 s/sc, 1 dec, 22 s/inc s/ , 22 S/SC, Inc S/SC , 2 S/SC
Row 40 – 54 S/SC, Inc S/SC , 2 SC
Row 41 – 22 S/SC, 1 dec, 9 SC, 1 dec, 23 SC
42 – 6 S/SC, 1 dec , 27 s/sc , 1 dec, 17 s/sc, inc. Row 45 – 11 sc , 1 dec , 11 sc , 1
dec , 10 sc , 1 dec , 12 sc , inc , 1 sbn Row 46 – 17 sc , 1 dec , 10 sc , 1 dec , 17 sc , inc , 1 sbn Row 47 – 11 sc , 1 dec , 17 sc , 1 dec , 15 sc , inc , 1 sbn Row 48 – 48 sc
Row 49 – 14 sc, 1 dec, 9 sc, 1 dec, 19 sc, inc , 3 sc
Row 50 – 11 sc, 1 dec, 12 sc, 1 dec, 16 sc, sc inc, 3 sc
Row 51 – 42 sc, sc inc, 3 sc
Row 52 – 15 sc, 1 dec, 8 sc, 1 dec, 16 sc, sc inc, 3 sc
Row 53 – 12 sc, 1 dec, 15 sc, 1 dec, 11 sc, sc inc, 3 sc
Row 54 – 40 sc, sc inc, 4 sc
Row 55 – 12 sc, 1 dec, 4 sc, 1 dec, 4 sc, 1 dec, 20 sc
Continue stuffing the body with polyester stuffing.
Row 56 – 6 s/sc, 1 dec, 4 s/sc, 1 dec, 7 s/sc, 1 dec, 3 s/sc, 1 dec, 10 s/sc, inc.s/sc , 4 s/sc
Row 57 – 9 s/sc, 1 sc, 4 s/sc, 4 sc, 4 s/sc, 1 sc/sc, 1 dec, 8 s/sc, inc.s/sc, 4 s/sc
Row 59 – 3 s/sc, 1 dec, 3 s/sc, 1 dec, 2 sc/sc, 1 dec, 2 sc/sc, 1 dec, 2 sc/sc, 1 dec, 6 sc/sc, inc.s/sc , 6 sc/sc Round 60 – 4 sc/sc, 3 dec, 12 sc/sc, inc.p/sc, 8 sc/sc Round 61 – 1 sc/sc, 4 dec, 9 sc/sc, inc.sc, 8 sc/sc Round 62 – 3 dec, 9 sc, inc.p/sc, 6 sc/sc Round 63 – 1 sc/sc, 1 dec, 1 sc/sc, 1 dec, 8 sc, inc.p/sc, 6 sc/sc, 2 dec.
Fasten the thread and cut a small end of it.
Stuff the body with toy stuffing.
Sew up the hole with a tapestry needle.
The loops highlighted in bold indicate the back row.
The loops highlighted in underline indicate the front row.
Leaving 2-3 loops near the front row, you can introduce the blue thread for the bird’s chest.
parrot body
Wings
Each wing consists of three parts: upper, middle and lower.
Any of the parts can be knitted not with the main color, but with an additional color.
In addition, rows of feathers can be of different colors.
Right. Upper part.
Consists of a base and four rows of feathers.
Knitting with turning rows.
Base.
1 row – ch., 4 sl st in the amigurumi ring,
2nd row – sl st, 3 times hr sl st, ch.
3rd row – 2 dc, dc inc, dc, dc inc 2 times, dc, dc, ch
4th row – 2 dc, ch 3 times (dc inc, dc), 2 dc, ch 2
5th row – dc s, dc inc, dc s, dc inc, dc 2 dc, dc, dc 2 times (dc inc, dc), dec, dc, ch
6th row – through 1st. 3 sc, inc s/sc, s/bn, sts/dc, inc s/dc, sts/dc, inc s/dc, 2 sc, (sts/s2n, s/s2n) in 1st, 3 d/s2n
base of a parrot wing
First row of feathers.
Row 7 – 9 ch. (sc, dc) in the second loop from the hook, 6 dc, dc, skip the loop, sc.
Work each feather in this way, working 2 feathers with 8 ch, 2 feathers with 7 ch, two feathers with 6 ch, two feathers with 5 ch, the number of sts decreases: 2 feathers – 5 sc, 2 feathers with 4 sc, 2 feathers with 3 sc, two feathers with 2 sc. The last stitch to be knitted is the VP.
First row of feathers
Row 8 – sl st in the skipped loop of the previous row, 4 ch., 7 times (sl st/bn in the next skipped loop of the previous row, 2 ch.), sl st/bn in the last skipped loop.
First row of feathers
Second row of feathers.
Row 9 – 9 ch (sc, dc) in the second loop from the hook, 7 dc, sl st in the 2-ch chain of the 8th row.
Work each feather like this, knitting two feathers with 8 ch, two feathers with 7 ch, two feathers with 6 ch, one feather with 5 ch, the number of dc decreases: two feathers with 6 dc, two feathers with 5 dc, two feathers with 4 dc, one feather with 3 dc. The last thing to work is a sl st in the 3rd ch, sl st.
Second row of feathers
Row 10 – make a chain of sl sts around the top of the loops of the 5th row
Second row of feathers
Third row of feathers.
Round 11 – 9 ch (sc, sl st) in the second loop from the hook, 7 sl st, sl st in the chain of round 10, skipping a loop.
Work each feather in this manner, working one feather with 8 ch, one feather with 7 ch, three feathers with 6 ch, two feathers with 5 ch. The number of sc decreases: one feather with 6 sc, one feather with 5 sc, three feathers with 4 sc, two feathers with 3 sc. The last stitch to be worked is the sl st.
Third row of feathers
Row 12 – chain stitch around the top of the loops of the 3rd row.
Fourth row of feathers.
Row 13 – 8 ch. (sc, sl st) in the second loop from the hook, 6 sl st, sl st in the chain of row 12, skipping a loop.
Work each feather in this manner, working one feather with 7 ch, one feather with 6 ch, two feathers with 5 ch, two feathers with 4 ch, the number of sc decreases: one feather with 5 sc, one feather with 4 sc, two feathers with 3 sc, two feathers with 2 sc. The last stitch to be worked is the sl st.
Fourth row of feathers
Fourth row of feathers, photo
Middle part.
Knitting with turning rows.
1 row – 10 ch, dec in 2nd and 3rd loops from hook, 7 sc, ch.
2nd row – 6 sc/dc, dec, sc/dc, 5 ch.
Row 3 – dec in 2nd and 3rd loops from hook, 2 sc, 7 sc behind back loop, ch.
Row 4 – 3 sc, 5 sl st, sl dec, 5 ch.
Row 5 – dec in 2nd and 3rd loops from hook, 2 sc, 9 sc behind back loop, ch.
Row 6 – 3 sl st, sl dec, 5 sl st, sl dec, 5 ch.
Row 7 – dec. in the 2nd and 3rd loops from the hook, 2 sc, 10 sc behind the back loop, ch.
Row 8 – 3 sc, 8 dc, dec. in dc, 4 ch.
Row 9 – dec. in the 2nd and 3rd loops from the hook, 2 sc, 12 sc behind the back loop, ch.
Row 10 – 12 sc, dec sc, 4 ch.
Row 11 – dec. in the 2nd and 3rd loops from the hook, sc, 13 sc behind the back loop, ch.
Row 12 – 3 sc, dc, dec. in dc, 7 dc, dec. in dc, 4 ch.
Row 13 – dec. in the 2nd and 3rd loops from the hook, sl st, 13 sl st behind the back loop, ch.
Row 14 – sc/sl st, 12 sc/sl st, dec. sc/sl st, 4 ch.
Row 15 – dec. in the 2nd and 3rd loops from the hook, sl st, 15 sl st behind the back loop, ch.
Row 16 – sc/sl st, sl st, 13 sl sts, dec. sc/sl st, 4 ch.
Row 17 – dec. in the 2nd and 3rd loops from the hook, sl st, 17 sl st behind the back loop, ch.
Row 18 – sc, 16 sc, dec. sc, 4 ch.
Row 19 – dec. in the 2nd and 3rd loops from the hook, sc, 19 sc behind the back loop, ch.
Row 20 – 3 sc, 16 sc, 2 sl st.
Left wing, middle section
Bottom section.
Round 1 – ch 33, sc in third loop from hook, 26 sc, ssd, sc, dec. sc, ch.
Round 2 – skip one loop, 3 sl st, 27 sc behind front loop, ch 2.
Round 3 – sl st, 15 sl st, 9 sl st, 2 sl st
Round 4 – skip one loop, sl st, 26 sl st behind back loop, ch 2.
Round 5 – ch.st./dc, 13 ch.st./dc, 7 sc, 2 sl st
Round 6 – skip one loop, sl st, 22 sc behind back loop, ch 2.
Row 7 – ch.p./dc, 11 ch.p./dc, 6 sc, 2 sl st
Row 8 – skip a loop, sc, 19 sc behind back loop of loop, ch 2
Row 9 – ch.p./dc, 9 ch.p./dc, 4 dc, 2 sl st
Row 10 – skip a loop, sl st, 15 dc behind back loop, ch 2
Row 11 – pr.p.s/dc, 11 sts/dc, s/bn, 2 ss
Left wing, bottom part
Tail
The tail consists of five parts: a middle part, two side parts consisting of an upper and a lower part (upper right/left, lower right/left).
Middle part. Top of the tail.
Middle part. Top of the tail
Cast 53 ch, sc in 2nd loop, 50 sl st, 3 sl st in a loop.
Bottom of the chain from the VP. – 51 s/bn.
Top right.
1st row – 51 ch, sc in 2nd st from hook, 48 sc, (sc, ch, sl st) in 1 loop,
Bottom of the chain – 16 sc, 17 sl st, 16 sc, ch.
2nd row – 45 sc behind the front loop, sl st. Fasten off the thread and cut it.
Row 3 – fasten the black yarn in loop 9 of row 2, (12 sc/sc, 22 sts/dc, sl st) behind the back loop of the loop.
Top right
Bottom right side.
1st row – ch 31, 1 sc in 2nd st from hook, 28 sc, (1 sc, ch, sl st) in 1 loop
Bottom side of chain – 15 sc, 14 sc, ch
2nd row – 26 sc behind back loop, ch
3rd row – 25 sc
Bottom right
Top left
, 1st row – ch 52, sc in 3rd st from hook, 15 sc, 17 sc/st, 16 sc, (sl st, ch, sc) in 1 loop,
Bottom side of chain – 49 sc
2nd row – sl st, 44 sc behind back loop, sl st. Fasten off the thread and cut it.
Row 3 – attach black yarn to the first loop of the previous row (22 sc, 12 sc, sl st) behind the back loop.
Top left side
Bottom left side
1 row – 31 ch, sc in the 2nd loop from the hook, 13 sc, 15 sl st, (sl st, ch, sl st) in 1 loop
Bottom side of the chain – 29 sl st
2 rows – sl st, 25 sl st behind the front loop arch, ch.
3rd row – 25 s/bn
Bottom left side
Beak
The lower part of the beak.
Knit in the round. The first two rows are black, in the 3rd – 5th rows a yellow yarn is introduced.
1st row – ch, 6 sc in amigurumi ring,
2nd row – 6 sc inc
, 3rd row – sc, sc inc, (3 sc inc in one loop, sc inc, sbn, sc inc, sbn, sc inc, 3 sc in one loop) with yellow yarn, sc inc, sbn.
4th row – (inc. st, st) 2 times, 5 st, (inc. st, st) 2 times, 5 st
5th row – 22 sc
6th row – 2 sc, sc inc, 12 st, sc inc, 6 st, sl st.
Bottom of the beak
The top of the beak.
Knitting with turning rows.
1 row – ch., 6 sc in the amigurumi ring, ch.
2nd line – S/SC, 4 Inc S/SC, S/SC, CH
3rd Line – 3 S/SC, 4 Inc S/SC, 3 S/SC, CH
4th Line – 6 S/SC, 2 Inc S/SC, 6 S/SC, PS/PS/CH,
2 SC, SC, SC, SC, SC,
SC, SC (SC, SC, SC (SC, SC, SC (SC/SC, SC (SC, SC (SC/SC, SC (SC/SC, SC (SC/SC, SC (SC/SC.
ps/dc, s/sc) in 1 loop, 2 s/sc, 4 sl st, s/sc, (s/sc, ch, s/s) in 1 loop, ch, sl st, (s/dc, ch, s/sc) in a loop, p/bn, 4 sl st, 2 p/bn, (sc/bn, dc/sl) in 1 loop, sl st.
Upper part of the beak
Eyes (2 pieces)
Knit in the round.
A black circle:
Ch, 6 sc in the amigurumi ring, sl st.
The second yellow circle:
Row 1 – Ch, 6 sc in the amigurumi ring, Ch
Row 2 – 6 sc inc
. A plastic eye is inserted in the center of the eye.
Eyes
Paws (2 pieces)
1 row – ch, 4 sc in the amigurumi ring, ch-2 row – sc, sc inc, sc, sc inc, ch-3 and 4 rows – 6 sc, ch-5 row – 6 sc, ch-8, go back along the ch-chain: sl st in the second loop from the hook, 6 sl st, sl st in the loop of the 4th row, Ch 14, go back along the chain: sl st in the second loop from hook, sl st 12, sl st in the loop of the 4th row, ch 14, go back along the chain: sl st in the second loop from hook, sl st 12, sl st in the loop of the 4th row, ch 8, go back along the chain: sl st in the second loop from hook, hook, sl st 6, sl st in the loop of the 4th row.
Paws
Assembling the bird
Tail.
Sew all the tail pieces together. First, sew the two upper side pieces together.
Sew along the top center of the tail.
Then sew the two lower side pieces together.
Work the lower and upper side pieces together along the edges with single crochet stitches.
Tail assembly
Sew the tail to the bottom of the body.
sew the tail to the body
sew the tail to the body
Wings.
Sew the three parts of each wing together.
First overlap the bottom part, then the middle part on top and the part with feathers on top.
we collect wingswe collect wings
Assembling wings, photo
Straighten the feathers and sew them to the wing. You can put some stuffing for soft toys under the top of the wings.
Sew the wings to the back of the body symmetrically to the center line.
Sew the wings symmetrically, leaving 10/11 cm from the head.
sew the wings to the body
Beak, eyes, paws.
Sew the beak, first the bottom part, put some stuffing for soft toys inside and sew the top part on top, stepping back a little from the edge.
Sew the eyes.
sew the beak, eyes, paws
Sew the paws.
To prevent the legs from falling off, you can insert thin threads inside and a piece of toothpick to secure the base of the legs.
Sewing the legs
I added artificial feathers to decorate the birds.