Quilting Patterns

The Snail Trail Block

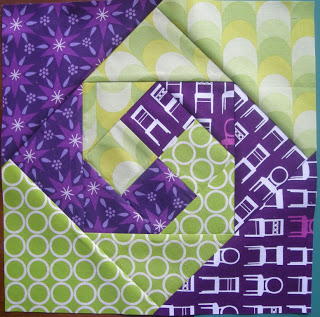
Quilting is an art form that blends creativity with craftsmanship, and few quilt blocks exemplify this union better than the Snail Trail block. With its intricate curves and striking design, the Snail Trail block is a favorite among quilters looking to add a touch of elegance and complexity to their projects. In this article, we’ll delve into the history, construction, and tips for mastering this beautiful block.

The Snail Trail block, also known as the Monkey Wrench or Indiana Puzzle, dates back to the 19th century. Its swirling design, reminiscent of a snail’s shell, has made it a popular choice for generations of quilters.

The block’s name and design evoke the slow, spiraling journey of a snail, symbolizing patience and perseverance – qualities that every quilter can appreciate.

The Snail Trail Block

At first glance, the Snail Trail block may seem complex, but with careful planning and attention to detail, it can be a rewarding addition to any quilt. Here’s a step-by-step guide to constructing this classic block:

Materials Needed

Assorted fabric scraps or fat quarters in contrasting colors
Rotary cutter and mat
Quilting ruler
Sewing machine
Thread
Iron and ironing board

Cutting the Fabric

Choose Your Fabrics: Select fabrics with high contrast to highlight the intricate design of the Snail Trail block. You’ll need a light and a dark fabric for the best effect.

Cut the Squares: Start by cutting two sets of squares. For a 12-inch finished block, cut:
2 squares from the light fabric, each 6 1/2 inches
2 squares from the dark fabric, each 6 1/2 inches

Subcut the Squares: Cut each square in half diagonally to create four triangles from each square. You should have a total of 8 triangles – 4 light and 4 dark.

Sewing the Block

  1. Pair and Sew Triangles: Pair each light triangle with a dark triangle, right sides together, and sew along the diagonal edge using a 1/4-inch seam allowance. Press the seams open.
  2. Create Half-Square Triangles (HSTs): Each pair of sewn triangles will form a half-square triangle (HST). You should now have four HST units.
  3. Assemble the Block: Arrange the HSTs in a spiral pattern, ensuring the colors alternate correctly to form the snail trail design. Sew the HSTs together in pairs, and then sew the pairs together to complete the block.
  4. Press and Square Up: Press the seams flat and square up the block to the desired size, typically 12 1/2 inches to allow for seam allowances.

Incorporating the Snail Trail Block into Your Quilts

The Snail Trail block can be a stunning focal point in a quilt or an eye-catching element in a more complex design. Here are a few ideas for incorporating this block into your projects:

  • Single Block Highlight: Use a single Snail Trail block as a central motif in a medallion quilt, surrounded by simpler blocks.
  • Repeating Pattern: Create a quilt with a repeating Snail Trail pattern for a dynamic and visually engaging design.
  • Scrappy Style: Use scraps of fabric to make each Snail Trail block unique, adding a playful and eclectic touch to your quilt.

See the Free Tutorial Here!

The Snail Trail block is a testament to the enduring appeal of traditional quilt designs. Its intricate, swirling pattern adds a touch of sophistication to any quilt, making it a favorite among quilters of all skill levels. With patience and precision, you can master this timeless block and incorporate it into your quilting projects, creating heirlooms that will be cherished for generations.

Happy quilting!

You may also like...