Desert Star Throw Pattern

Welcome to My Crafts Ideas! Today, we’re excited to share the beautiful Crochet Desert Star Throw pattern. This intricate and stunning throw is perfect for adding a touch of warmth and style to your home decor. Follow along for all the details and instructions to create this masterpiece.

Gauge and Measurements

  • Gauge: One diamond motif measures approximately 4¼ x 6¾” (10.5 x 17 cm). CHECK YOUR GAUGE. Use any size hook to obtain the gauge.
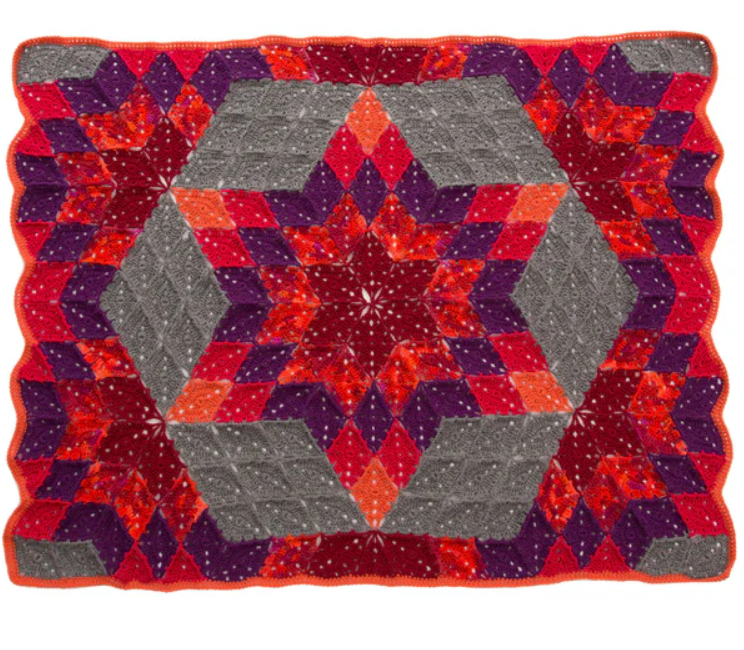
  • Finished Size: The throw measures about 54 x 77” (137 x 195.5 cm).

Special Stitches

For the border, use any of the following decreases at inner corners to help keep the edge of the throw flat:

  • dc2tog (double crochet 2 stitches together): [Yarn over, insert hook in next stitch, yarn over and pull up loop, yarn over, draw through 2 loops] 2 times, yarn over, draw through all 3 loops on hook.
  • dc3tog (double crochet 3 stitches together): [Yarn over, insert hook in next stitch, yarn over and pull up loop, yarn over, draw through 2 loops] 3 times, yarn over, draw through all 4 loops on hook.
  • sc2tog (single crochet 2 stitches together): [Insert hook in next stitch, yarn over and pull up a loop] twice, yarn over and draw through all 3 loops on hook.
  • sc3tog (single crochet 3 stitches together): [Insert hook in next stitch, yarn over and pull up a loop] 3 times, yarn over and draw through all 4 loops on hook.
Desert Star Throw Pattern

Notes

  1. The throw is made from 208 diamond motifs and 18 triangle motifs, for a total of 226 motifs.
  2. Diamond motifs are worked in the round with the right side always facing. Triangle motifs are worked back and forth in rows.
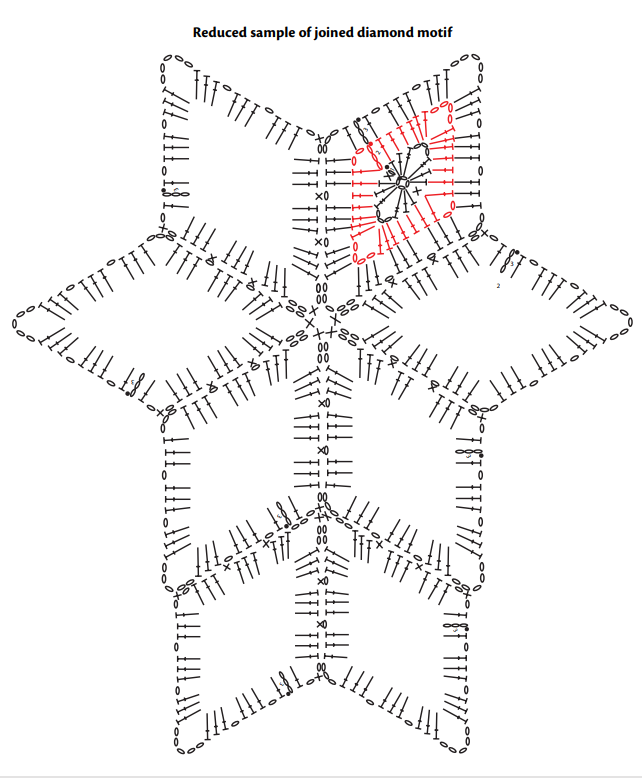
  3. The first motif is worked separately. All other motifs are joined to previous motifs while working round/row 3, using the join-as-you-go method. Stitch diagrams are provided for the diamond motif, triangle motif, and joining of diamond motifs. If desired, all motifs can be worked separately and sewn together instead.
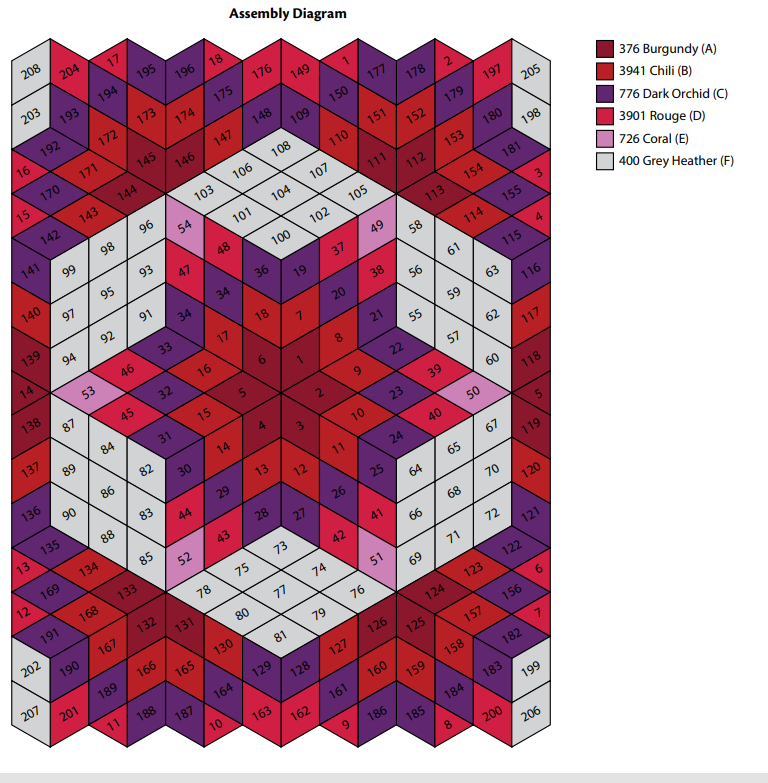
  4. Follow the assembly diagram for the arrangement and color of motifs. Make and join the center six diamond motifs first. Then work outward, making and joining the remaining motifs. The assembly diagram provides a suggested order for making and joining the motifs, but they may be joined in any order.
  5. A border is worked all the way around the outer edge of the completed throw.

First Diamond Motif

  1. With A, ch 4; join with slip st in first ch to form a ring.
  2. Round 1 (right side): Ch 1, *(sc, hdc, dc, tr, ch 3, tr, dc, hdc) in ring; repeat from * once more; join with slip st in first sc—14 sts and 2 ch-3 spaces.
  3. Round 2: Ch 5 (counts as dc, ch 2), dc in same sc as joining, dc in next 3 sts, (3 dc, ch 4, 3 dc) in next ch-3 space, dc in next 3 sts, (dc, ch 2, dc) in next sc, dc in next 3 sts, (3 dc, ch 4, 3 dc) in next ch-3 space, dc in last 3 sts; join with slip st in 3rd ch of beginning ch 5—28 dc, 2 ch-2 spaces, and 2 ch-4 spaces.
  4. Round 3: Ch 3 (counts as dc), (dc, ch 3, dc) in first ch-2 space, dc in next 2 sts, ch 1, skip next st, dc in next 3 sts, ch 1, skip next st, (3 dc, ch 5, 3 dc) in next ch-4 space, ch 1, skip next st, dc in next 3 sts, ch 1, skip next st, dc in next 2 sts, (dc, ch 3, dc) in next ch-2 space, dc in next 2 sts, ch 1, skip next st, dc in next 3 sts, ch 1, skip next st, (3 dc, ch 5, 3 dc) in next ch-4 space, ch 1, skip next st, dc in next 3 sts, ch 1, skip next st, dc in last st; join with slip st in top of beginning ch-3—36 sts, 8 ch-1 spaces, 2 ch-3 spaces, and 2 ch-5 spaces. Fasten off.

Second Diamond Motif

  1. With A, work same as the first motif through Round 2—28 dc, 2 ch-2 spaces, and 2 ch-4 spaces.
  2. Hold the first and second motifs with wrong sides together and stitches matching.
  3. Work Round 3 with the right side of the second motif facing you.
  4. As you work Round 3, you will join the first side edge of the second motif to one side edge of the first motif.
  5. Unless otherwise indicated, work stitches of Round 3 into the stitches of the second motif.

Round 3 (joining round):

  • Join to first motif: Ch 3 (counts as dc), dc in first ch-2 space, ch 1, sc in corresponding ch-3 space of first motif, ch 1, dc in same ch-2 space of second motif, dc in next 2 sts, sc in next ch-1 space of first motif, skip next st of second motif, dc in next 3 sts, sc in next ch-1 space of first motif, skip next st of second motif, 3 dc in next ch-4 space, ch 2, sc in next ch-5 space of first motif, ch 2, 3 dc in same ch-4 space of second motif;
  • Complete Round 3 with no further joining: Ch 1, skip next st, dc in next 3 sts, ch 1, skip next st, dc in next 2 sts, (dc, ch 3, dc) in next ch-2 space, dc in next 2 sts, ch 1, skip next st, dc in next 3 sts, ch 1, skip next st, (3 dc, ch 5, 3 dc) in next ch-4 space, ch 1, skip next st, dc in next 3 sts, ch 1, skip next st, dc in last st; join with slip st in top of beginning ch-3—36 sts, 4 ch-1 spaces, 2 ch-3 spaces, and 2 ch-5 spaces. Fasten off.
Third, Fourth, and Fifth Motifs

Work the same as the second motif, joining the first side edge to the corresponding side edge of the previous motif. Refer to the assembly and stitch diagrams to see where to place and join each motif.

Sixth Motif

Work the same as the second motif, joining the first side edge to the fifth motif and, in a similar manner, join the second side edge to the first motif.

Remaining Diamond Motifs (make and join 202 more)

Work each motif the same as the second motif, joining side edge(s) to previous motif(s) following the assembly and stitch diagrams. CHECK MOTIF PLACEMENT ON ASSEMBLY DIAGRAM CAREFULLY.

Notes:

  1. Following the assembly diagram, join the ch-spaces of the motif being made to the corresponding ch-spaces of the neighboring motif(s), as follows:
    • As you work across an edge to be joined to a neighboring motif, do not work the ch-1’s, ch-3’s, and/or ch-5’s. Work “joining ch-spaces” instead as described in b-d.
    • Instead of working a ch-1, work: sc in the corresponding ch-space of the neighboring motif.
    • Instead of working a ch-3, work: ch 1, sc in the corresponding ch-space of the neighboring motif, ch 1.
    • Instead of working a ch-5, work: ch 2, sc in the corresponding ch-space of the neighboring motif, ch 2.
  2. Use the color indicated in the assembly diagram.
  3. Some motifs will be joined beginning at a ch-5 space. Some motifs will join a ch-3 space to a ch-5 space. Refer to the stitch diagram to see examples of joining between motifs in different locations.
  4. Where more than 2 points come together, join at points by working a single crochet into the single crochet of a previous joining.

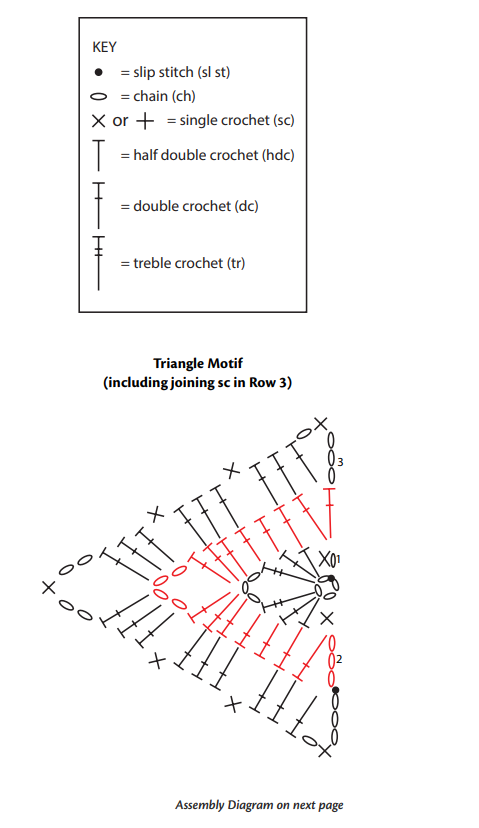
Triangle Motifs (make and join 18)

  1. With the color indicated on the assembly diagram, ch 4; join with slip st in first ch to form a ring.
  2. Row 1 (right side): Ch 1, (sc, hdc, dc, tr, ch 3, tr, dc, hdc, sc) in ring; do not join, TURN—8 sts and 1 ch-3 space.
  3. Row 2: Ch 3 (counts as dc), dc in first 4 sts, (3 dc, ch 4, 3 dc) in the ch-3 space, dc in next 3 sts, 2 dc in last st, turn—16 sts and 1 ch-4 space.
    • Refer to the assembly diagram for the placement of the triangle motif.
    • Hold the triangle motif and neighboring motifs with wrong sides together and stitches matching.
    • Work Row 3 with the right side of the triangle motif facing you.
    • As you work Row 3, you will join two side edges of the triangle motif to one side edge of each of two diamond motifs.
    • Unless otherwise indicated, work stitches of Row 3 into the stitches of the triangle motif.

Row 3:

  • Ch 3 (counts as dc), sc in corresponding ch-space of neighboring motif, ch 1, dc in first 3 sts of triangle motif, sc in next ch-space of neighboring motif, skip next st of triangle motif, dc in next 3 sts, sc in next ch-space of neighboring motif, skip next st of triangle motif, 3 dc in next ch-4 space, ch 2, sc in sc of previous joining (for the tip of triangle), ch 2, 3 dc in same ch-4 space of triangle motif, sc in corresponding ch-space of neighboring motif, skip next st of triangle motif, dc in next 3 sts, sc in next ch-space of neighboring motif, skip next st of triangle motif, dc in next 2 sts, dc in top of beginning ch-3 of Row 2, ch 1, sc in next ch-space of neighboring motif, ch 3, slip st in top of beginning ch-3 of Row 2. Fasten off.

Finishing

Border

  1. With the right side facing, join E in any stitch on the outer edge.
  2. Round 1 (right side): Ch 1, work sc evenly spaced all the way around, working 2 or 3 sc at each outer point and sc2tog or sc3tog at each inner corner to keep the piece flat; join with slip st in first sc.
  3. Round 2: Ch 3, dc in each st around, working 3-5 dc in each outer point and dc2tog or dc3tog at each inner corner to keep work flat; join with slip st in top of beginning ch-3. Fasten off.
  4. Weave in ends.

Diagram 1:

Diagram 2:

Assembly Diagram

ABBREVIATIONS
A, B, C = Color A, Color B, Color C etc; ch= chain; dc = double crochet; hdc = half double crochet; sc = single crochet; st(s) = stitch(es); tr = treble (triple) crochet; yo = yarn over; () = work directions in parentheses into same st; [ ] = work directions in brackets the number of times specified; * = repeat whatever follows the * as indicated.

And there you have it! Your beautiful Desert Star Throw is complete. Enjoy the cozy warmth and stunning design this throw brings to your space. Happy crocheting!