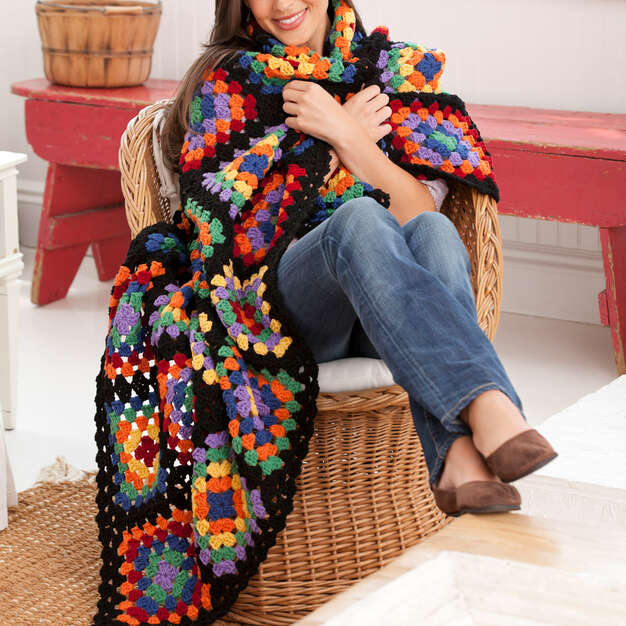
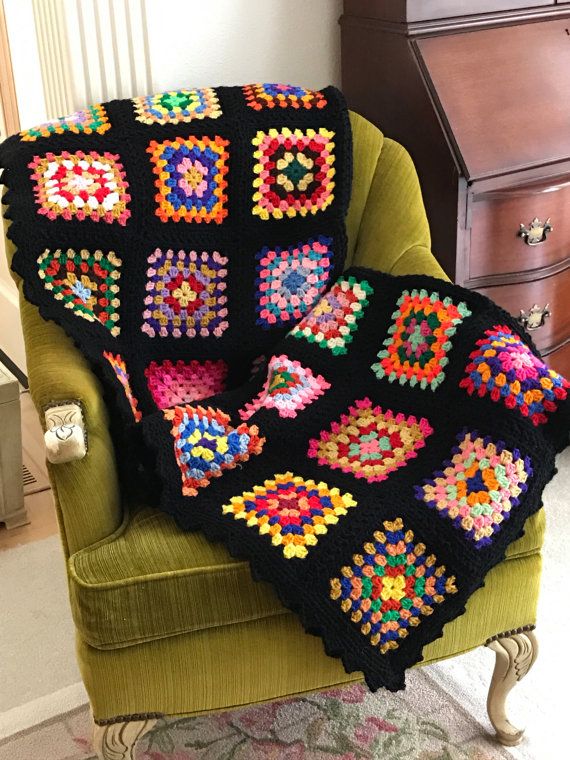
The Traditional Granny Throw is a classic crochet project that combines timeless design with creative flexibility. This guide will walk you through the process of creating a beautiful Granny Throw, including specific instructions, color combinations, and tips to ensure your project turns out perfectly.
Materials Needed
Crochet Hooks:
6.0 mm [US J-10]
5.5 mm [US I-9] (for Round 2 of the border only)
Yarn: Red Heart® With Love™ or similar, available in various solid and multi-color options.
Other Supplies: Scissors, yarn needle.
Gauge
Rounds 1-2: 3¼” in diameter.
Square: 8 x 8”.
Crochet Instructions
Note: On Rounds 2-6, begin with a chain 3 (ch 3) or use the following beginning double crochet (dc): wrap yarn around hook, yarn over (yo) and draw up a loop in specified space, then complete as for a regular dc.
Color Combinations
Make 7 squares in each of the following color combinations:
Square 1: E, C, D, G, and B.
Square 2: D, B, F, C, and E.
Square 3: F, E, D, B, and C.
Square 4: B, G, C, E, and F.
Square 5: C, D, E, B, and G.
Square 6: G, F, B, C, and D.
Making the Throw
First Square:
Round 1: With the first color and larger hook, chain 4; join with a slip stitch to form a ring.
Instructions: Ch 3 (counts as dc here and throughout), 2 dc in ring, ch 2, [3 dc, ch 2] 3 times in ring; join with a slip st in beginning ch-3 – 12 dc; 4 ch-2 spaces. Fasten off.
Round 2: With the right side facing and larger hook, join 2nd color in any ch-2 space.
Instructions: Ch 3, (2 dc, ch 2, 3 dc) in same corner space, *ch 1, (3 dc, ch 2, 3 dc) in next ch-2 space; repeat from * around, ch 1; join with a slip st in top of beginning ch-3 – 24 dc; 4 ch-2 spaces; 4 ch-1 spaces. Fasten off.
Round 3: With the right side facing and larger hook, join 3rd color in any ch-1 space.
Instructions: Ch 3, 2 dc in same space, ch 1, (3 dc, ch 2, 3 dc) in next ch-2 space, ch 1*, 3 dc in next ch-1 space; repeat from * around, ending last repeat at **; join with a slip st in top of beginning ch-3 – 36 dc; 4 ch-2 spaces; 8 ch-1 spaces. Fasten off.
Round 4: With the right side facing and larger hook, join 4th color in first ch-1 space to the left of any corner ch-2 space.
Instructions: Ch 3, 2 dc in same space, ch 1, 3 dc in next ch-1 space, ch 1, (3 dc, ch 2, 3 dc) in corner ch-2 space, ch 1*, 3 dc in next ch-1 space; repeat from * around, ending last repeat at **; join with a slip st in top of beginning ch-3 – 48 dc; 4 ch-2 spaces; 12 ch-1 spaces. Fasten off.
Round 5: With the right side facing and larger hook, join 5th color in first ch-1 space to the left of any corner ch-2 space.
Instructions: Ch 3, 2 dc in same space, [ch 1, 3 dc] in each of next 2 ch-1 spaces, ch 1, (3 dc, ch 2, 3 dc) in corner ch-2 space, ch 1*, 3 dc in next ch-1 space; repeat from * around, ending last repeat at **; join with a slip st in top of beginning ch-3 – 60 dc; 4 ch-2 spaces; 16 ch-1 spaces. Fasten off.
Round 6: With the right side facing and larger hook, join A in first ch-1 space to the left of any corner ch-2 space.
Instructions: Ch 3, 2 dc in same space, [ch 1, 3 dc] in each of next 3 ch-1 spaces, ch 1, (3 dc, ch 4, 3 dc) in corner ch-2 space, ch 1*, 3 dc in next ch-1 space; repeat from * around, ending last repeat at **; join with a slip st in top of beginning ch-3 – 72 dc; 4 ch-2 spaces; 20 ch-1 spaces. Fasten off.
See more than 30 free patterns here
Note: The throw can be either sewn together or crocheted together. If sewing, work all squares through Round 6. Arrange squares following the assembly diagram and whipstitch together through the back loops of stitches. If crocheting together, work all squares through Round 5, arrange following the assembly diagram, then work Round 6 around the first square at the top left and join remaining squares together while completing Round 6.
Second and Successive Squares:
Round 6 (Joining Round): With the right side facing and larger hook, join A in first ch-1 space to the left of any corner ch-2 space, ch 3, 2 dc in same space, continue in the pattern of Round 6 around, joining across one or two sides as required as follows: join ch-4 spaces by working ch 2, drop loop from hook, insert hook in corresponding ch-4 space, draw dropped loop through, ch 2; join 2nd dc of each 3-dc group by working (2 dc, drop loop from hook, insert hook in corresponding dc, draw dropped loop through, dc) in ch-1 space; join ch-1 spaces by working ch 1, drop loop from hook, insert hook in corresponding ch-1 space, draw dropped loop through, ch 1; where 4 corners meet, work ch 2, drop loop from hook, insert hook in corresponding ch-4 space, draw dropped loop through, ch 1, skip next ch-4 corner space, insert hook in next ch-4 corner space, draw dropped loop through, ch 2; complete same as First Square Round 6. Fasten off.
Border
Round 1: With the right side facing and larger hook, join A with a slip st in any ch-1 space to the left of any corner ch-4 space.
Instructions: Ch 3, 2 dc in same space, [ch 1, 3 dc] in each ch-1 space and each joined ch-4 space across to next ch-4 corner space, ch 1*, (3 dc, ch 4, 3 dc) in corner ch-4 space, repeat from * around, ending last repeat at **; join with a slip st in top of beginning ch-3.
Round 2: With a smaller hook, slip st in the next dc, ch 1, (sc, ch 2, sc) in the same dc.
Instructions: Ch 1, slip st in the next ch-1 space, ch 1, (sc, ch 2, sc) in the center dc of the next 3-dc group; repeat across to the next corner, ch 1, (sc, ch 2, sc, ch 3, sc, ch 2, sc) in the next ch-4 corner space, repeat around, ending last repeat, ch 1, slip st in the next ch-1 space, ch 1; join with a slip st in the first sc. Fasten off. Weave in ends.
This guide includes detailed steps and specific instructions to help you create a stunning Traditional Granny Throw. Happy Crocheting!