Tapestry needle
Scissors
Stitch marker (optional)
Crochet Abbreviations (US Terms)
sc – single crochet
dc – double crochet
ch – chain
inc – increase
dec – decrease
BLO – back loop only
sl st – slip stitch
Pattern Instructions
Cap
R1: 6 sc into magic ring (6)
R2: inc x6 (12)
R3: (sc, inc) x6 (18)
R4: (sc, inc, sc) x6 (24)
R5: (3 sc, inc) x6 (30)
R6: (2 sc, inc, 2 sc) x6 (36)
R7: 36 sc around (36)
Fasten off.
Stem
R1: 6 sc into magic ring (6)
R2: inc x6 (12)
R3: (sc, inc) x6 (18)
R4: 18 sc BLO (18)
R5: 18 sc (18)
R6: (7 sc, dec) x2 (16)
R7: (6 sc, dec) x2 (14)
R8: (5 sc, dec) x2 (12)
R9: 12 sc (12)
R10: (4 sc, dec) x2 (10)
R11: (3 sc, dec) x2 (8)
R12–R14: 8 sc (8)
R15: (2 sc, dec) x2 (6)
R16: inc x6 (12)
R17: (sc, inc) x6 (18)
R18: (sc, inc, sc) x6 (24)
R19: (3 sc, inc) x6 (30)
R20: (2 sc, inc, 2 sc) x6 (36)
R21: 36 sc (36)
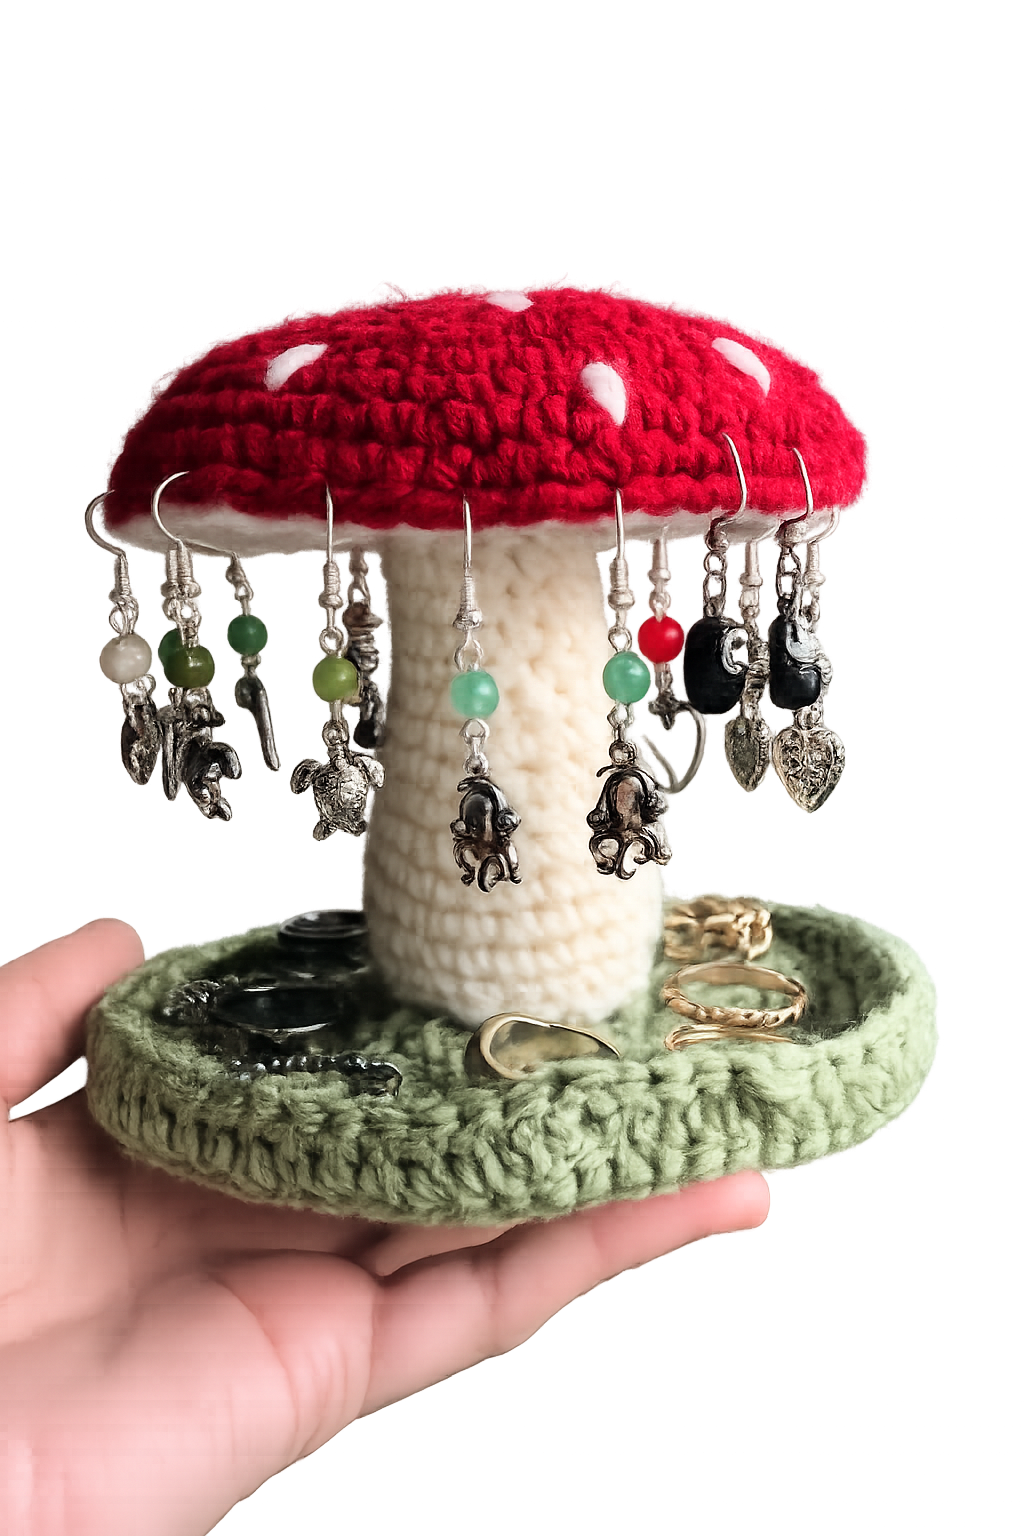
Sew the cap securely to the stem.
Tray / Dish (Make 2)
R1: 2 ch, 15 dc into magic ring, sl st into chain
R2: 3 ch, dc, (dc inc) x15, sl st into chain
R3: 3 ch, dc inc, (1 dc, dc inc) x15
R4: 3 ch, dc inc, 1 dc, (1 dc, dc inc, 1 dc) x15
Pull the loop to hold placement and sew the mushroom to the tray.
Tray Finishing
Cut a cardboard circle to match the tray size.
Place the cardboard between the two tray layers.
Join the layers by chaining 3 and working dc evenly around.
Finish with a sl st into the top chain and fasten off.
Final Assembly & Tips
Make sure the mushroom stem is centered before attaching it to the tray
Adjust the tray size by adding or removing increase rounds
Use neutral tones for a minimalist look or bold colors for a playful design
This holder works beautifully for rings, earrings, and bracelets
Final Thoughts
This Crochet Mushroom Jewelry Holder is a delightful blend of function and fantasy. It’s a satisfying project that results in a useful, eye-catching piece you’ll enjoy using every day. Whether you keep it for yourself or gift it to someone special, this mushroom is sure to be a conversation starter.