- With A, work same as the first motif through Round 2—28 dc, 2 ch-2 spaces, and 2 ch-4 spaces.
- Hold the first and second motifs with wrong sides together and stitches matching.
- Work Round 3 with the right side of the second motif facing you.
- As you work Round 3, you will join the first side edge of the second motif to one side edge of the first motif.
- Unless otherwise indicated, work stitches of Round 3 into the stitches of the second motif.
Round 3 (joining round):
- Join to first motif: Ch 3 (counts as dc), dc in first ch-2 space, ch 1, sc in corresponding ch-3 space of first motif, ch 1, dc in same ch-2 space of second motif, dc in next 2 sts, sc in next ch-1 space of first motif, skip next st of second motif, dc in next 3 sts, sc in next ch-1 space of first motif, skip next st of second motif, 3 dc in next ch-4 space, ch 2, sc in next ch-5 space of first motif, ch 2, 3 dc in same ch-4 space of second motif;
- Complete Round 3 with no further joining: Ch 1, skip next st, dc in next 3 sts, ch 1, skip next st, dc in next 2 sts, (dc, ch 3, dc) in next ch-2 space, dc in next 2 sts, ch 1, skip next st, dc in next 3 sts, ch 1, skip next st, (3 dc, ch 5, 3 dc) in next ch-4 space, ch 1, skip next st, dc in next 3 sts, ch 1, skip next st, dc in last st; join with slip st in top of beginning ch-3—36 sts, 4 ch-1 spaces, 2 ch-3 spaces, and 2 ch-5 spaces. Fasten off.
Third, Fourth, and Fifth Motifs
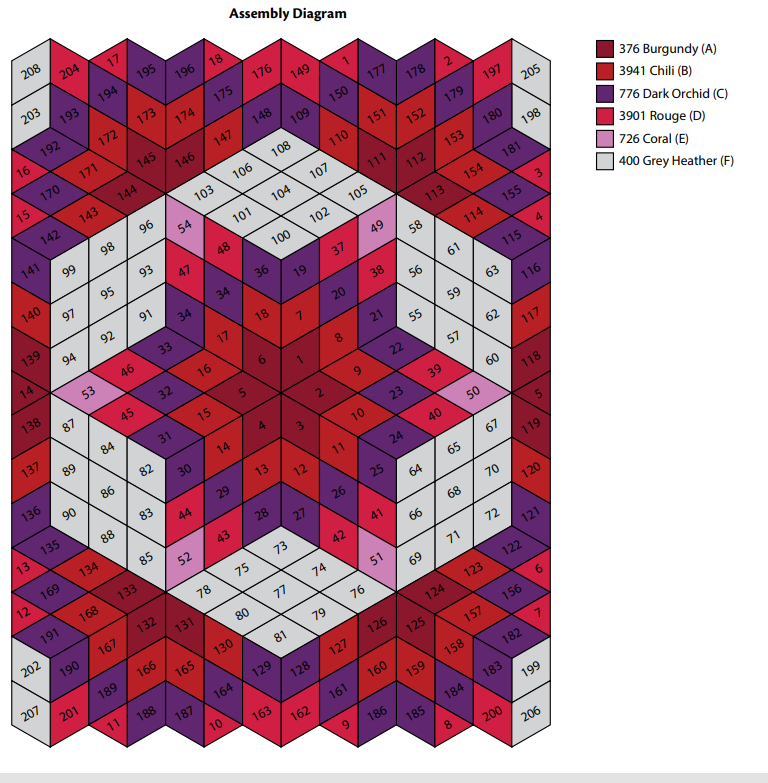
Work the same as the second motif, joining the first side edge to the corresponding side edge of the previous motif. Refer to the assembly and stitch diagrams to see where to place and join each motif.
Sixth Motif
Work the same as the second motif, joining the first side edge to the fifth motif and, in a similar manner, join the second side edge to the first motif.
Remaining Diamond Motifs (make and join 202 more)
Work each motif the same as the second motif, joining side edge(s) to previous motif(s) following the assembly and stitch diagrams. CHECK MOTIF PLACEMENT ON ASSEMBLY DIAGRAM CAREFULLY.
Notes:
- Following the assembly diagram, join the ch-spaces of the motif being made to the corresponding ch-spaces of the neighboring motif(s), as follows:
- As you work across an edge to be joined to a neighboring motif, do not work the ch-1’s, ch-3’s, and/or ch-5’s. Work “joining ch-spaces” instead as described in b-d.
- Instead of working a ch-1, work: sc in the corresponding ch-space of the neighboring motif.
- Instead of working a ch-3, work: ch 1, sc in the corresponding ch-space of the neighboring motif, ch 1.
- Instead of working a ch-5, work: ch 2, sc in the corresponding ch-space of the neighboring motif, ch 2.
- Use the color indicated in the assembly diagram.
- Some motifs will be joined beginning at a ch-5 space. Some motifs will join a ch-3 space to a ch-5 space. Refer to the stitch diagram to see examples of joining between motifs in different locations.
- Where more than 2 points come together, join at points by working a single crochet into the single crochet of a previous joining.
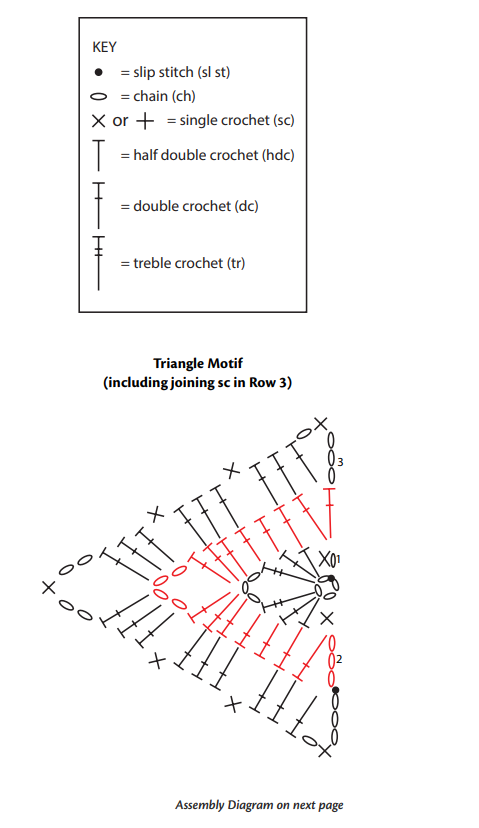
Triangle Motifs (make and join 18)
- With the color indicated on the assembly diagram, ch 4; join with slip st in first ch to form a ring.
- Row 1 (right side): Ch 1, (sc, hdc, dc, tr, ch 3, tr, dc, hdc, sc) in ring; do not join, TURN—8 sts and 1 ch-3 space.
- Row 2: Ch 3 (counts as dc), dc in first 4 sts, (3 dc, ch 4, 3 dc) in the ch-3 space, dc in next 3 sts, 2 dc in last st, turn—16 sts and 1 ch-4 space.
- Refer to the assembly diagram for the placement of the triangle motif.
- Hold the triangle motif and neighboring motifs with wrong sides together and stitches matching.
- Work Row 3 with the right side of the triangle motif facing you.
- As you work Row 3, you will join two side edges of the triangle motif to one side edge of each of two diamond motifs.
- Unless otherwise indicated, work stitches of Row 3 into the stitches of the triangle motif.
Row 3:
- Ch 3 (counts as dc), sc in corresponding ch-space of neighboring motif, ch 1, dc in first 3 sts of triangle motif, sc in next ch-space of neighboring motif, skip next st of triangle motif, dc in next 3 sts, sc in next ch-space of neighboring motif, skip next st of triangle motif, 3 dc in next ch-4 space, ch 2, sc in sc of previous joining (for the tip of triangle), ch 2, 3 dc in same ch-4 space of triangle motif, sc in corresponding ch-space of neighboring motif, skip next st of triangle motif, dc in next 3 sts, sc in next ch-space of neighboring motif, skip next st of triangle motif, dc in next 2 sts, dc in top of beginning ch-3 of Row 2, ch 1, sc in next ch-space of neighboring motif, ch 3, slip st in top of beginning ch-3 of Row 2. Fasten off.
Finishing
Border
- With the right side facing, join E in any stitch on the outer edge.
- Round 1 (right side): Ch 1, work sc evenly spaced all the way around, working 2 or 3 sc at each outer point and sc2tog or sc3tog at each inner corner to keep the piece flat; join with slip st in first sc.
- Round 2: Ch 3, dc in each st around, working 3-5 dc in each outer point and dc2tog or dc3tog at each inner corner to keep work flat; join with slip st in top of beginning ch-3. Fasten off.
- Weave in ends.
Diagram 1:
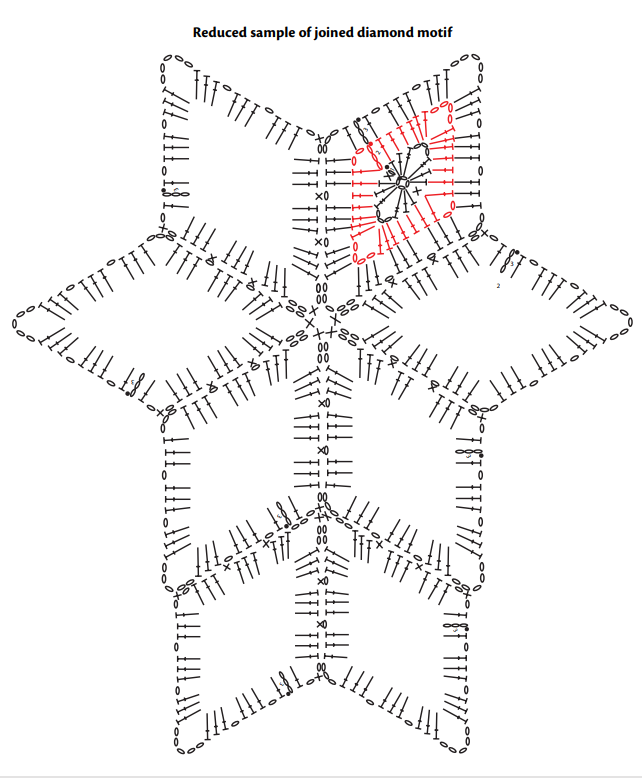
Diagram 2:
Assembly Diagram
ABBREVIATIONS
A, B, C = Color A, Color B, Color C etc; ch= chain; dc = double crochet; hdc = half double crochet; sc = single crochet; st(s) = stitch(es); tr = treble (triple) crochet; yo = yarn over; () = work directions in parentheses into same st; [ ] = work directions in brackets the number of times specified; * = repeat whatever follows the * as indicated.
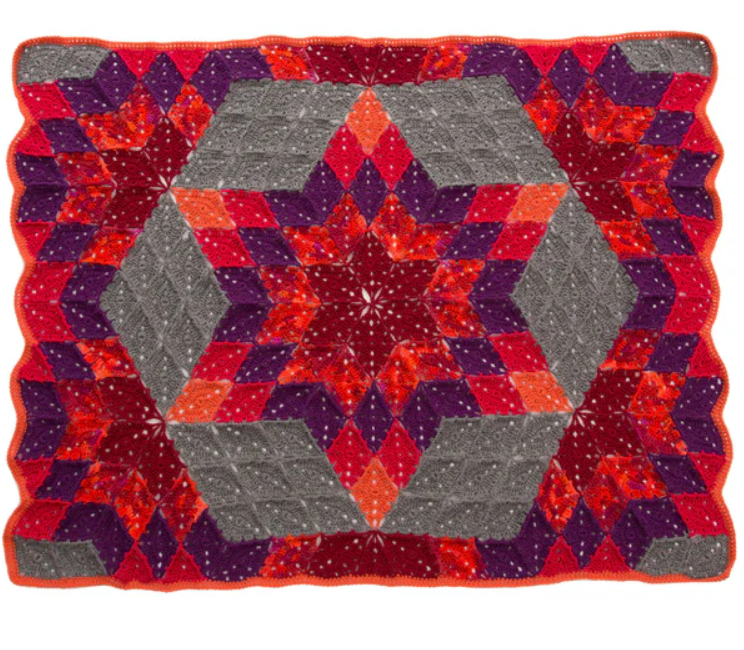
And there you have it! Your beautiful Desert Star Throw is complete. Enjoy the cozy warmth and stunning design this throw brings to your space. Happy crocheting!