This pattern appears to describe the beginning of a Tunisian crochet project, starting with a strip that involves creating a series of triangles. Below is a breakdown of the instructions provided for the first triangle:
First Strip (Using Yarn A)
Chain (ch) 113
First Triangle
1st row: Work 1 regular single crochet (sc) in the 2nd chain from the hook. Do not turn.
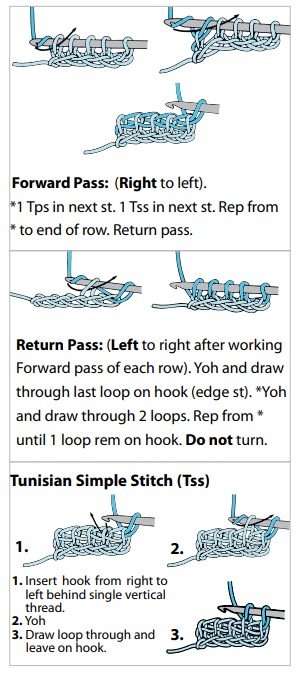
2nd row: Forward pass (Right to left): Draw up a loop through the front bar of the first stitch.
Draw up a loop in the next chain. You should now have 3 loops on your hook.
Do not turn.
Return pass (Left to right):
Yarn over (yoh) and draw through 2 loops on the hook.
Repeat this (yoh and draw through 2 loops) once more.
You should now have 1 loop remaining on the hook.
Do not turn.
3rd row: Forward pass (Right to left): Work a Tunisian simple stitch (Tss) in each of the first 2 stitches.
Draw up a loop in the next chain. You should now have 4 loops on your hook.
Do not turn.
Return pass (Left to right):
Yarn over and draw through 2 loops on the hook.
Repeat this (yoh and draw through 2 loops) two more times.
You should now have 1 loop remaining on the hook.
Do not turn.
4th row: Forward pass (Right to left): Work a Tss in each of the first 3 stitches.
Draw up a loop in the next chain. You should now have 5 loops on your hook.
Do not turn.
Return pass (Left to right):
Yarn over and draw through 2 loops on the hook.
Repeat this (yoh and draw through 2 loops) three more times.
You should now have 1 loop remaining on the hook.
Do not turn.
5th row: Forward pass (Right to left): Work a Tss in each of the first 4 stitches.
Draw up a loop in the next chain. You should now have 6 loops on your hook.
Do not turn.
Return pass (Left to right):
Yarn over and draw through 2 loops on the hook. Repeat this (yoh and draw through 2 loops) four more times.
You should now have 1 loop remaining on the hook. Do not turn.
It looks like you are working on a pattern that involves Tunisian crochet techniques, including the Tunisian simple stitch (Tss) and various pass methods. Here’s a breakdown of your instructions with a bit of clarification:
Initial Triangle
Row 1 (Forward Pass): Yarn over (Yoh) and draw through 2 loops on the hook 5 times. 1 loop remains on the hook. Do not turn.
Row 6 (Forward Pass, Right to Left): Tss in each of the first 5 stitches.
Draw up a loop in the next chain. You should have 7 loops on the hook. Do not turn.
Row 6 (Return Pass, Left to Right): Yarn over and draw through 2 loops on the hook 6 times. 1 loop remains on the hook. Do not turn.
Row 7: Slip stitch (sl st) loosely in each of the next 5 single vertical bars.
Slip stitch in the last worked chain.
The first triangle is complete. 1 loop remains on the hook.
First Square
Row 1 (Forward Pass, Right to Left): Draw up a loop in each of the next 6 chains and leave them on the hook. You should have 7 loops on the hook. Do not turn.
Return Pass for All Rows: Yarn over and draw through 2 loops on the hook repeatedly until 1 loop remains on the hook. Do not turn.
Rows 2 to 5 (Forward Pass, Right to Left): Tss in each of the first 5 stitches.
Draw up a loop in the next chain. Repeat these steps for the next 4 rows.
Next Row: Slip stitch loosely into each of the next 5 single vertical bars.
Slip stitch in the last worked chain. The first square is complete.
Second to Tenth Squares
Repeat the instructions for the first square.
Last Triangle
Row 1 (Forward Pass, Right to Left): Draw up a loop in each of the last 6 chains and leave them on the hook. You should have 7 loops on the hook. Do not turn.
Return Pass for All Rows: Yarn over and draw through 2 loops on the hook repeatedly until 1 loop remains on the hook. Do not turn.
Row 2 (Forward Pass, Right to Left): Tss in each of the first 5 stitches. Do not turn.
Row 3 (Forward Pass, Right to Left): Tss in each of the first 4 stitches. Do not turn.
Row 4 (Forward Pass, Right to Left): Tss in each of the first 3 stitches. Do not turn.
Row 5 (Forward Pass, Right to Left): Tss in each of the first 2 stitches. Do not turn.
Row 6 (Forward Pass, Right to Left): Tss in the first stitch. Do not turn.
Return Pass (Left to Right): Yarn over and draw through 2 loops on the hook. 1 loop remains on the hook. Fasten off.
Second Strip (Worked with B)
First Square: With the right side (RS) facing, join B with a slip stitch at the top corner of the first triangle of the previous strip.
Row 1 (Forward Pass, Right to Left): Working through both loops of the slip stitches, draw up a loop in each of the next 5 slip stitches.
Draw up a loop in the first stitch of the next square of the previous strip and leave on hook. You should have 7 loops on the hook. Do not turn.
Return Pass for All Rows: Yarn over and draw through 2 loops on the hook repeatedly until 1 loop remains on the hook. Do not turn.
Rows 2 to 5 (Forward Pass, Right to Left): Tss in each of the first 5 stitches.
Draw up a loop in the next stitch of the next square. Repeat these steps for the next 4 rows.
Next Row: Slip stitch loosely into each of the next 5 single vertical bars.
Slip stitch in the top of the next square of the 1st strip. The first square of the second strip is complete.
Second to Eleventh Squares
Repeat the instructions for the first square of the second strip.
Third Strip (Worked with C)
First Triangle: With RS facing, join C with a slip stitch to the same space where the first square of the previous strip started.
Row 1 (Forward Pass, Right to Left): Chain 1, 1 single crochet (sc) in the same space as the slip stitch.
Draw up a loop through the front vertical bar of the first sc.
Draw up a loop in the first stitch of the next square of the previous strip and leave on hook. You should have 3 loops on the hook.
Return Pass: Yarn over and draw through 2 loops on the hook twice. 1 loop remains on the hook. Do not turn.
Row 2 (Forward Pass, Right to Left): Tss in each of the first 2 stitches.
Draw up a loop in the next stitch of the next square. You should have 4 loops on the hook. Do not turn.
Return Pass: Yarn over and draw through 2 loops on the hook 3 times. 1 loop remains on the hook. Do not turn.
Row 3 (Forward Pass, Right to Left): Tss in each of the first 3 stitches.
Draw up a loop in the next stitch of the next square. You should have 5 loops on the hook. Do not turn.
Return Pass: Yarn over and draw through 2 loops on the hook 4 times. 1 loop remains on the hook. Do not turn.
the loop. You should now have 7 loops on your hook. Do not turn.
Return Pass (Left to Right): (Yoh and draw through 2 loops on the hook) 6 times: Yarn over and pull through 2 loops on the hook, repeat this process 6 times until only 1 loop remains on the hook. Do not turn.
6th Row
Forward Pass: Sl st loosely in each of next 5 single vertical bars: Slip stitch loosely in each of the next 5 vertical bars (from the previous Tunisian rows).
Sl st in top of next square: Slip stitch in the top of the adjacent square. This completes the first triangle of the third strip.
First to Tenth Squares
With C (assuming C is the yarn color): Work as given for First Square of Second Strip: Repeat the pattern for the first square of the second strip. Follow the specific instructions provided for the first square.
Last Triangle
1st Row
Forward Pass (Right to Left):
Tss in each of first 5 stitches: Work a Tunisian Simple Stitch (Tss) in each of the first 5 stitches.
Draw up a loop in the same space where the last stitch was made: Insert the hook in the same space where the last stitch was made, yarn over, and pull up a loop. You should have 7 loops on your hook.
Do not turn.
Work from **** to **** as given for last Triangle of First Strip:
Follow the instructions from the last triangle of the first strip, within the boundaries indicated by the asterisks.
Fasten off at end of last row: Cut the yarn and pull the end through the final loop to secure it.
Continuing the Stripe Pattern
Rep Second and Third Strips 10 times more: Repeat the instructions for the second and third strips 10 more times to complete the stripe pattern.
Fasten off: Secure the yarn at the end of the last strip.
Tassels (Make 4)
- Wind L around a piece of cardboard 6″ [15 cm] wide 20 times: Wrap the yarn around the cardboard 20 times.
- Tie through loops securely at one end: Tie the yarn through the loops at one end of the wrapped yarn.
- Cut across other end: Cut the yarn loops at the opposite end.
- Wrap yarn 6 times around Tassel 1½” [4 cm] down from tied end: Wrap yarn around the tassel about 1½” (4 cm) down from the tied end and secure it.
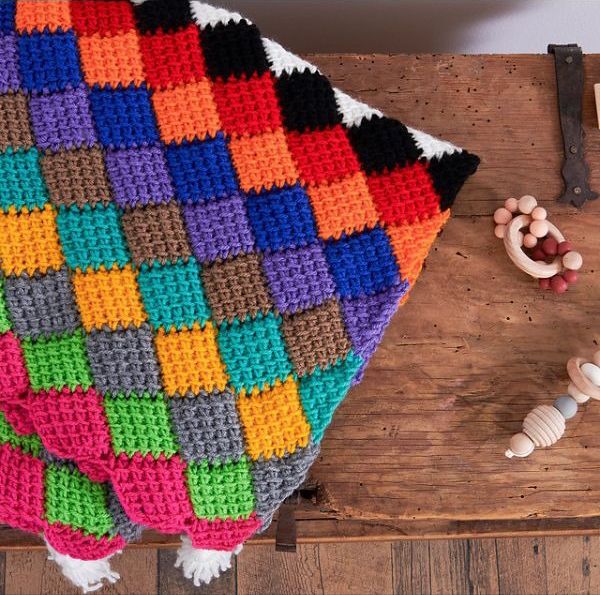
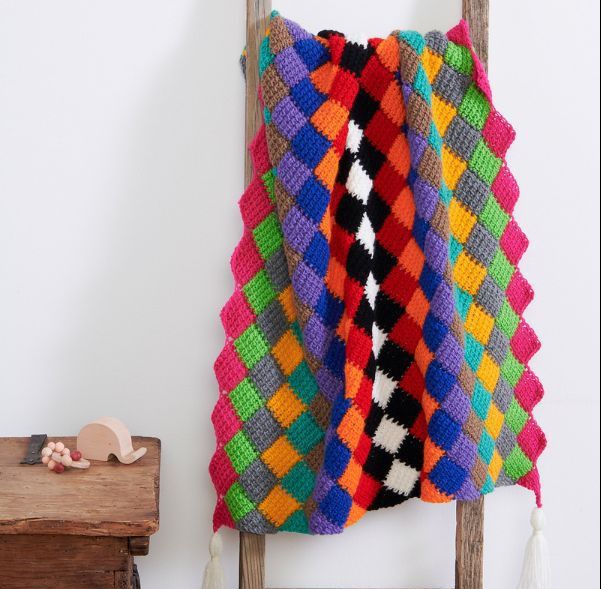
- Sew 1 Tassel to each corner of Blanket as shown in photo: Attach one tassel to each corner of the blanket.

Entrelac crochet is a captivating technique that can elevate your crochet projects to new heights. With its intricate, woven appearance, it’s sure to impress anyone who sees your work. Take your time, enjoy the process, and watch as your project transforms into a beautiful, textured masterpiece.
Happy crocheting, and be sure to share your entrelac crochet creations with us on social media using the hashtag #MyCraftsIdeas!