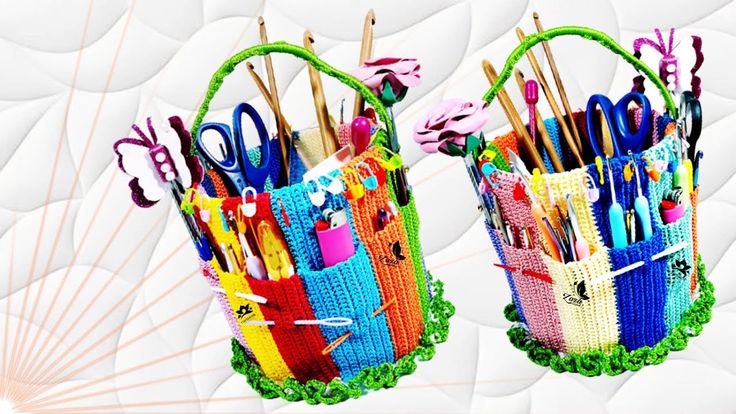
Are you tired of searching for your crochet hooks, scissors, or tape measure every time you sit down to work on a project? Say hello to your new favorite crochet accessory—the Handicraft Bucket Yarn Hook Organizer! This practical and stylish organizer is designed to keep all your crochet tools in one place, making your crafting sessions more enjoyable and efficient.
In this blog post, I’ll walk you through a detailed crochet pattern to create your very own bucket organizer. Whether you’re a beginner or an experienced crocheter, this project is perfect for you. Let’s dive in!
Materials Needed
Yarn in your favorite colors (choose durable, medium-weight yarn)
Work in back and forth rows unless specified otherwise. At the beginning of each row, crochet 1 chain stitch (ch) to achieve the proper height. This does not replace the first crochet stitch in the row.
Step-by-Step Instructions
1. Crochet the Short Strip Leave a 30 cm (11.8 in) yarn tail before starting. This will be used later for sewing. Chain 22 stitches (ch 22). Rows 1 to 8: Crochet 8 rows as follows: [1 ch, 22 single crochet (sc), turn]. After Row 8, cut the yarn, leaving an 8 cm (3.2 in) tail, and pull it through the last stitch.
2. Crochet the Long Strip Using the same color, chain 50 stitches (ch 50). This will create a strip for a bucket up to 20 cm (7.9 in) tall.
Rows 1 to 8: Crochet 8 rows as follows: [1 ch, 50 sc, turn]. After Row 8, cut the yarn, leaving an 8 cm (3.2 in) tail, and pull it through the last stitch.
3. Join the Strips Place the long strip underneath and the short strip on top. Using a new color, insert your hook into the first two stitches of both strips and crochet 1 ch to start the row.
Lay the starting yarn strand along the row and crochet 22 sc, enclosing the yarn end. After 5 cm (2 in), cut the yarn end so it disappears into the row. Crochet another 28 sc into the long strip, enclosing the yarn end of the previous color.
4. Create the Pockets Row 10 (Dividing Row): Crochet 1 ch and 28 sc. Then, crochet 22 sc into the lower loops, leaving the upper 22 loops unused. Turn your work. Rows 11 to 16: Crochet 6 rows as follows: [1 ch, 50 sc, turn].
Row 17: Fold your work lengthwise and crochet into the remaining loops. Crochet 1 ch and 22 sc. Rows 18 to 23: Crochet 6 rows as follows: [1 ch, 22 sc, turn]. Repeat these steps to create a total of 9 pockets. Adjust the number of pockets or rows to fit your bucket’s circumference.
5. Sew the Organizer Sew the narrow sides of the two parts together, leaving space for the bucket handle. Fold the upper edge of the organizer over the bucket’s rim and crochet a finishing edge.
6. Add the Bottom and Handle Crochet a sturdy bottom to prevent the bucket from slipping through. Wrap and crochet around the bucket handle for a polished look.
Final Touches Once your organizer is complete, fill the pockets with your crochet hooks, scissors, tape measure, and other tools. Tie the loops at the top to secure the organizer to the bucket.
Why You’ll Love This Organizer Customizable: Choose your favorite colors and adjust the size to fit any bucket.
Practical: Keeps all your tools in one place, making crafting sessions more organized.
Portable: Carry your supplies with ease wherever you go.
Stitch Guide Chain Stitch (ch): The foundation of most crochet projects. Single Crochet (sc): A basic stitch that creates a tight, dense fabric. Slip Stitch (sl st): Used to join rounds or create seamless edges.
Video Tutorial:
I hope you enjoy making this Handicraft Bucket Yarn Hook Organizer as much as I did! It’s a fun and functional project that will make your crafting life so much easier. Don’t forget to share your finished organizer on social media and tag My Crafts Ideas—I’d love to see your creations!