Pay particular attention to the starting chains and the joining slip stitch. The video counts the beginning ch-3 as the first double crochet in the early rounds and shows how to join without counting the slip stitch as an additional stitch. Those small details help keep all seven sections aligned.
Begin at the Center
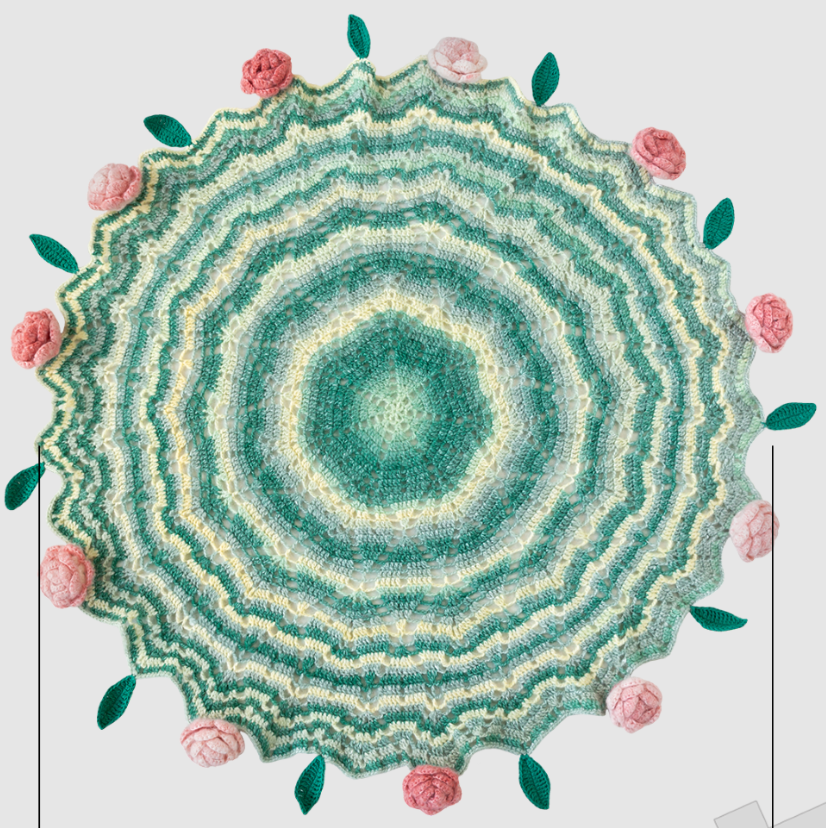
The blanket starts with a ring of four chains. In Round 1, seven double crochets are separated by two chains. Round 2 places a two-double-crochet increase in each previous double crochet, with chain spaces between the groups. Round 3 increases again, establishing the seven repeated sections that continue outward.
The later rounds combine solid double-crochet sections, chain spaces, increases, and decreases. The designer demonstrates a dc2tog for Round 9 and a dc3tog for Round 13. When working the remaining rounds, keep the printed chart beside you and check each section before completing all seven repeats. The video demonstrates the techniques but does not recite every stitch count from Rounds 4–38.
Crochet the Flowers and Leaves
For each rose, begin with a foundation chain of 52 stitches and work a row of single crochet. The following rows create V-shaped spaces, then fuller shells, and finally rounded petals. Roll the finished strip from its starting end, offset the petals as you go, and stitch across the base several times to hold its shape.
The leaves begin with a 14-chain foundation and an additional turning chain. Their shape comes from moving from short stitches to taller ones at the widest part, then back to short stitches at the tip. Work down the opposite side of the foundation chain to make a balanced oval leaf. Leave sewing tails so you can attach each piece neatly.
Arrange the Floral Border
Lay the finished blanket flat before sewing anything down. Space the 11 roses around the edge first, adjusting their positions until they look balanced. Secure each rose through the middle of its base and the edge of the blanket, then place a leaf between neighboring flowers. The video shows how to sew these pieces firmly without flattening the petals.
Weave the sewing tails into the wrong side and block the blanket according to the fiber content of your yarn. If your yarn contains acrylic, avoid pressing it directly with a hot iron. A gentle finishing treatment will help the circular body lie smoothly while preserving the raised flowers.
Keep the chart, stitch key, and construction notes together while you crochet. Download the English Heartfelt Bouquet Blanket PDF guide below to follow the center, flowers, leaves, and assembly in one place.
The blanket and original charts are by Susan’s Family. Their official project page contains the source tutorial. If you intend to distribute a PDF containing their charts through your blog, obtain their permission to reproduce those images first.
Heartfelt Bouquet Blanket Crochet Pattern | English Guide
Color can give the Heartfelt Bouquet Blanket a very different mood without changing its construction. Try a soft green body with blush flowers for a spring garden look, or choose a neutral body and deeper rose shades for a more dramatic border. Before sewing the decorations in place, lay your yarn colors beside the finished blanket to see how they work together in natural light.
Because the flowers sit along the outer edge, this blanket makes a lovely gift to display over a sofa or at the foot of a bed. If you are making it for someone special, you could choose flower colors that remind them of a favorite garden or season. Take your time arranging the pieces before attaching them; small adjustments to their spacing can make the finished border feel balanced.