Mini Crochet Rose Pot

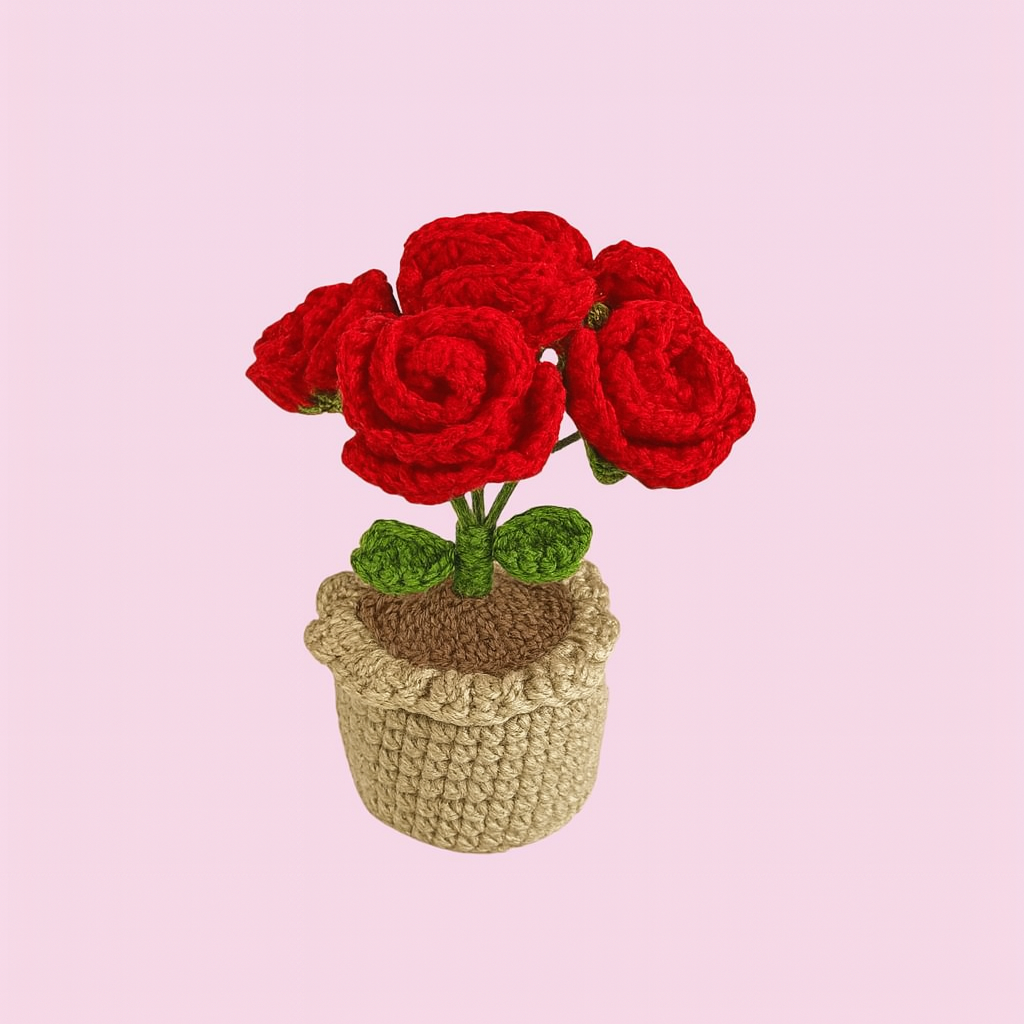
There’s something irresistibly charming about tiny handmade creations especially when they mimic nature’s most beautiful blooms. The Mini Crochet Rose Pot is the perfect blend of craft and beauty, combining vibrant petals, delicate leaves, and a cozy pot to create a keepsake that never fades. Whether you’re looking for a quick gift, home decor project, or an adorable market item, this miniature rose pot will brighten any space.

With just a few scraps of yarn, a crochet hook, and a little bit of love, you can create these stunning flowers that look fresh all year round. Great for beginners and experienced crocheters alike, this project offers a satisfying balance of simplicity and detail. And best of all? There’s no watering required!

In this tutorial, you’ll learn how to crochet the flower, leaves, stem, and pot—all worked up in soft yarn for a cheerful, long-lasting bloom. Whether you craft one or a dozen, these little rose pots are a heartwarming way to bring the garden indoors.

Mini Crochet Rose Pot

🧶 Materials Needed

  • Yarn:

    • Red (for rose)

  • Green (for stem and leaves)

  • Beige, brown, or white (for the pot and soil)

  • Hook: 3.0 mm – 4.0 mm (depending on your yarn)

  • Fiberfill stuffing

  • Tapestry needle

  • Scissors

  • Floral wire (optional, for added stem structure)

  • 🌹 Pattern Instructions

    1. Crochet the Pot (Base + Rim)

    Start with the base (brown or beige):

    • Rnd 1: 6 sc in a magic ring

    • Rnd 2: 2 sc in each st around (12)

    • Rnd 3: 1 sc, inc around (18)

    • Rnd 4: 2 sc, inc around (24)

    • Continue increasing until base is the desired width.

    • Work even (no increases) for 8–10 rounds for the pot’s height.

    • Optional: Add a decorative rim by working 1 dc, ch 1 in each st around for the last round.

    2. Crochet the Rose Flower

    • Chain 40–50 (adjustable).

    • In the 2nd chain from the hook, work the following:
      sc, hdc, 2 dc, 2 tr, 2 dc, hdc, sc in each chain repeat.

    • This creates a wavy strip. Roll the strip tightly into a rose shape and sew the base to secure.

    3. Crochet the Leaves (Make 2–3)

    • Ch 6

    • In 2nd ch from hook: sc, hdc, dc, hdc, sc

    • Fasten off and leave a tail for sewing.

    4. Make the Stem

    • Use green yarn to create a tight chain of about 10–15 ch.

    • Optionally insert floral wire and wrap yarn around it for stability.

    • Attach the stem to the rose and leaves.

    5. Assembly

    • Insert fiberfill into the pot.

    • Stick the stem through the center and secure it by sewing or gluing.

    • Arrange leaves around the base of the rose.

    • Adjust and shape the flower and leaves for the best presentation.

    🌸 Why You’ll Love This Project

    • Beginner-friendly: Great for those learning amigurumi or floral crochet.

    • Versatile: Makes a sweet desk decoration, pin cushion, or wedding favor.

    • Quick to Make: One flower takes under 2 hours to complete.

    • Perfect Gift: Ideal for Mother’s Day, Valentine’s, or birthdays.

    The Mini Crochet Rose Pot is a wonderful way to bring flowers into your home without ever worrying about wilting petals. It’s a beautiful, handmade treasure that celebrates your love for crochet and creativity. Whether placed on a windowsill or gifted to a loved one, this little rose will surely make hearts bloom.

    You Are Here:

    We use cookies to offer you the best experience on our website. By continuing to browse, you confirm that you accept these terms.