- Row 1: Sc in each of the 7 marked sts; ch 1 and turn. 7 sc.
- Row 2: Sc2tog over the first 2 sts, sc in the next 3 sts, sc2tog over the last 2 sts; ch 1 and turn. 5 sc.
- Row 3: Sc2tog, sc in the center st, sc2tog; ch 1 and turn. 3 sc.
- Row 4: Sc3tog over all 3 sts; fasten off. 1 st at the tip.
Repeat on the second marked group. If the ears curl, block them lightly after finishing.
3. White outline — 68 sc
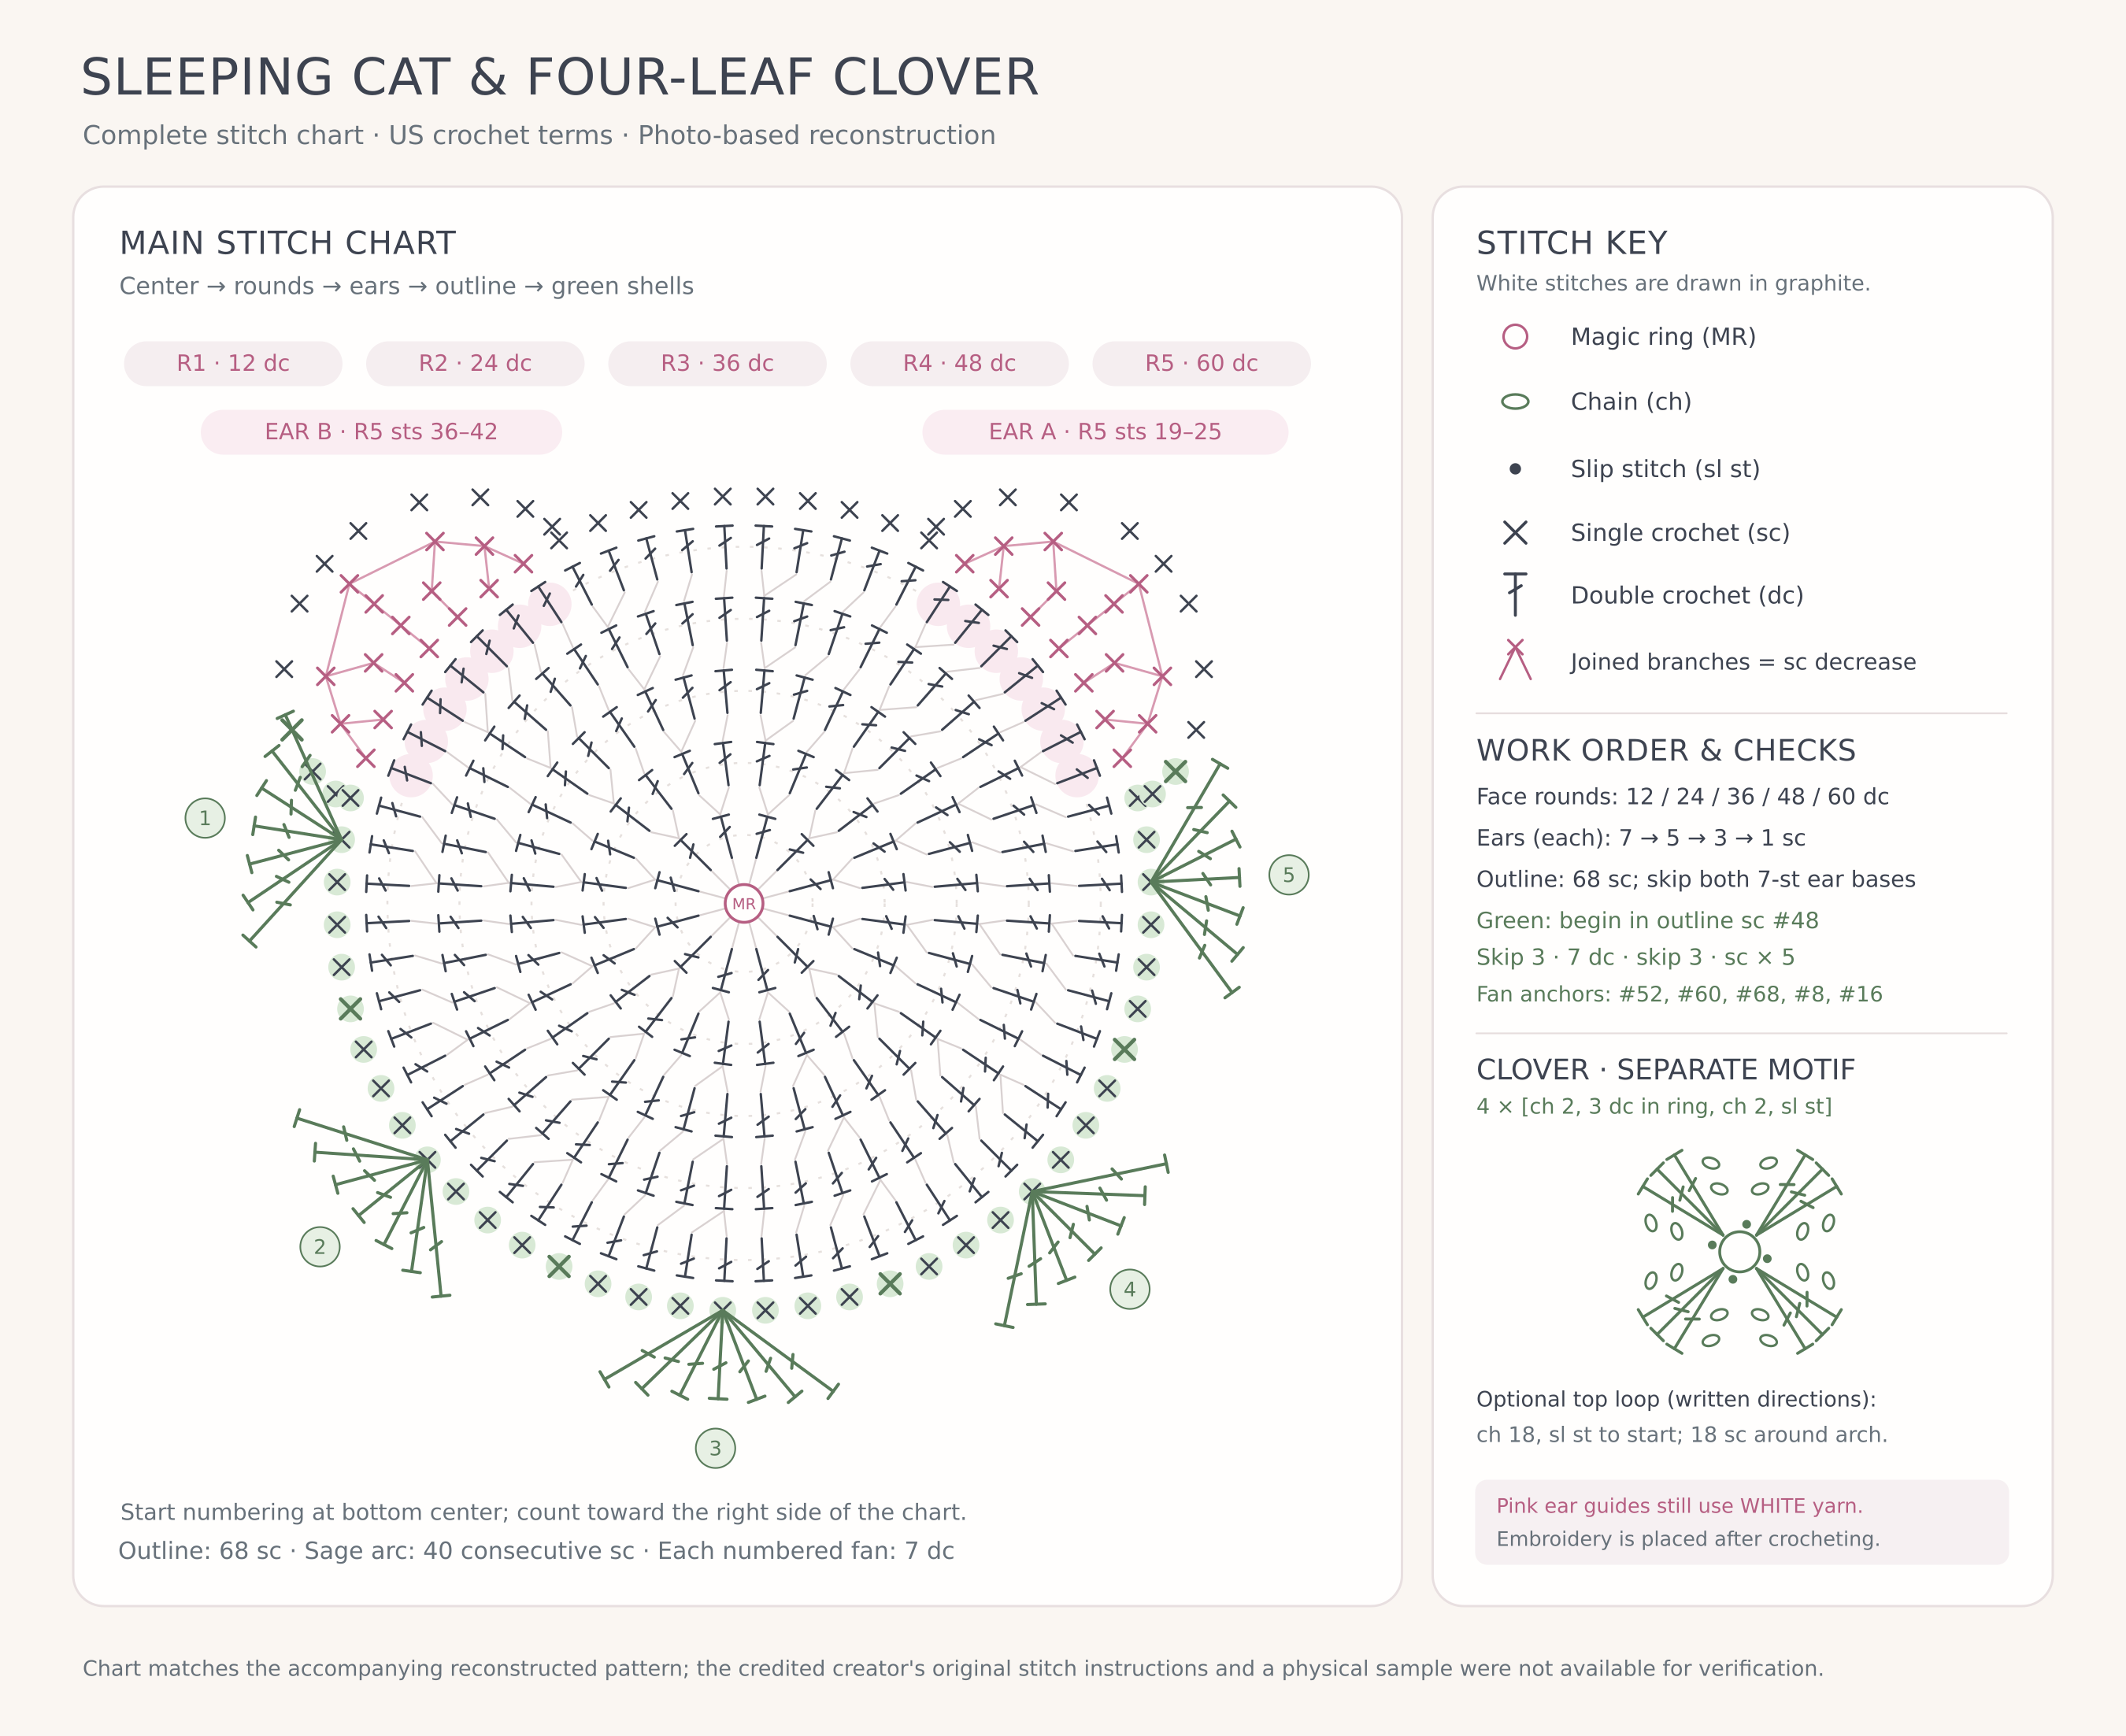
Join white at Rnd 5, st 1 at the bottom. Work 1 sc in each exposed Rnd 5 stitch. At an ear, do not work into the seven Rnd 5 stitches covered by its base. Instead, work 1 sc into each of the four row ends up its first side, 3 sc into its tip stitch, and 1 sc into each of the four row ends down its other side. Continue around the second ear in the same way. Join with a sl st to the first outline sc and fasten off.
You should have 68 outline sc: 60 Rnd 5 stitches − 14 covered ear-base stitches + 22 ear-outline stitches = 68. Number these outline stitches 1–68, beginning at the bottom-center join. This numbering is used for the green edging. Work the joining sl st only to close the outline; do not count it as an sc.
4. Sage-green shell edging — five shells
With the face RS up and the bottom-center outline stitch at the bottom, locate the sequence of 40 consecutive outline sc from #49–68, then #1–20. Join sage green with 1 sc in outline sc #48, immediately before that sequence.
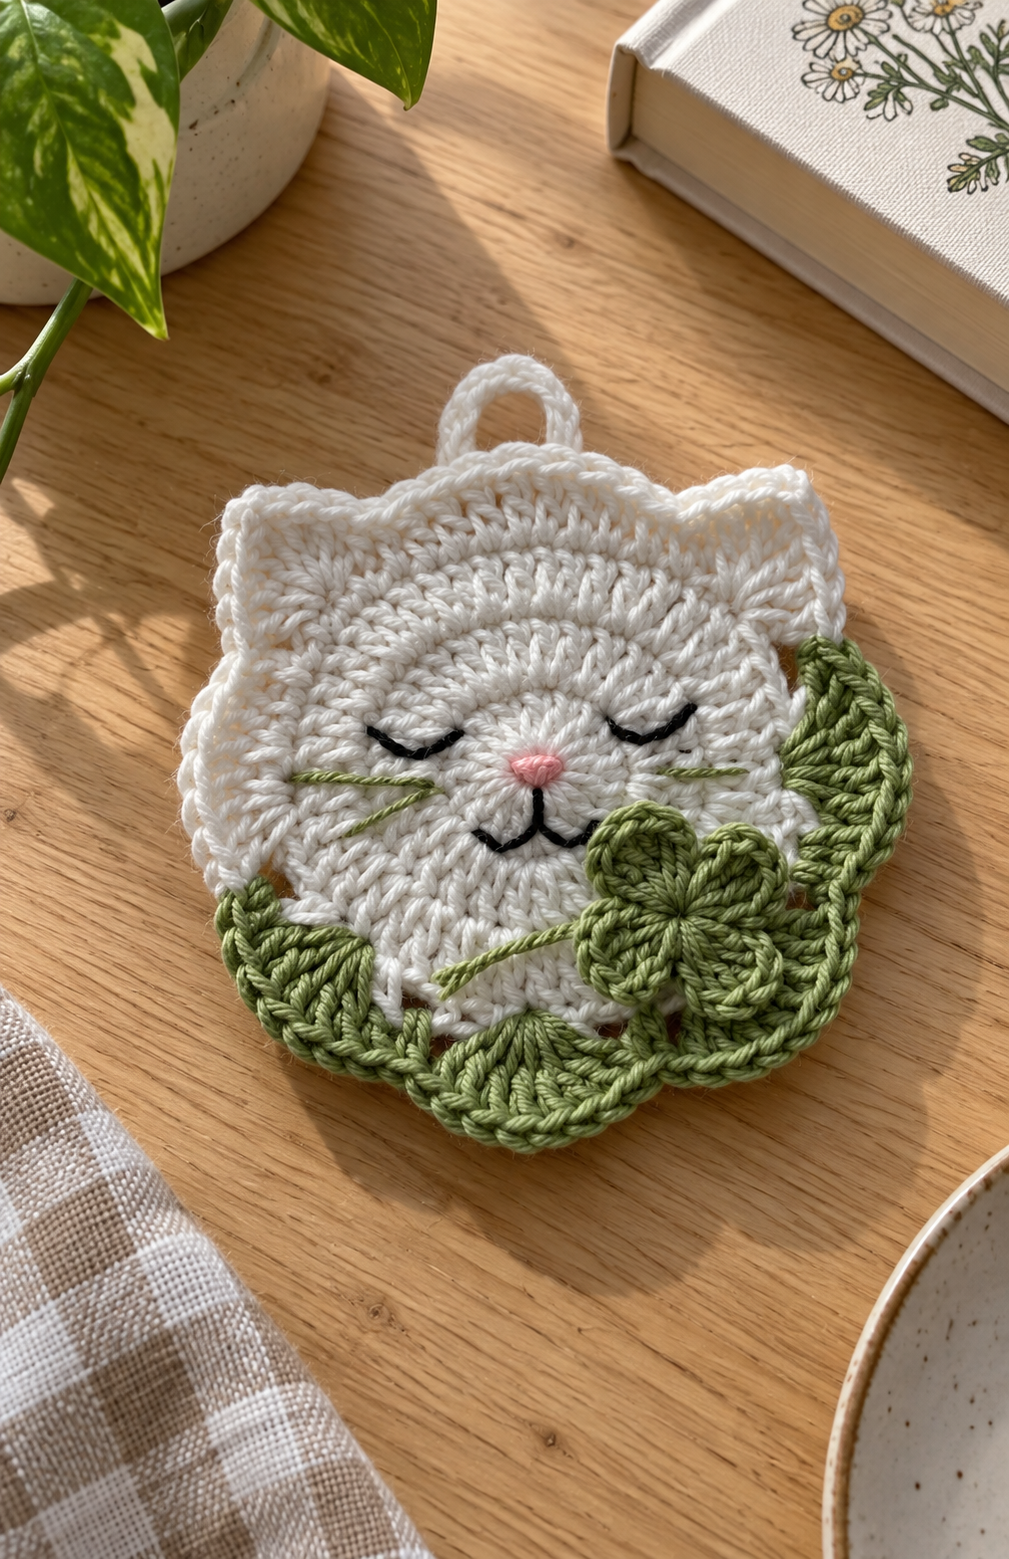
Repeat this eight-stitch unit five times: skip 3 outline sc, work 7 dc into the next outline sc, skip 3 outline sc, sc in the next outline sc. Fasten off after the fifth unit. The seven-dc shells are anchored in outline stitches #52, #60, #68, #8, and #16; the last anchoring sc goes into #20. The green edging therefore uses exactly 40 outline stitches without extra increases or gaps.
5. Four-leaf clover
With sage green, make a magic ring. Repeat the following four times into that ring: ch 2, 3 dc, ch 2, sl st. The chains shape the sides of each leaf and do not count as dc. Pull the ring closed, fasten off, and leave a long sewing tail. Sew the clover over the shells at the lower right of the face, securing its center while leaving the leaves raised.
For the little stem across the chest, ch about 16 with green. Sew one end beside the left shell and the other beneath the clover; let the chain lie loosely across the white face. Adjust the chain length to your own piece before securing it.
6. Embroidered face
- Eyes: With fine black yarn, embroider two gently downward-curved closed eyes on the upper half of the face. Mark their positions first so they look balanced.
- Nose: Embroider a small, rounded pink triangle in the center, below the eyes.
- Mouth: With black, stitch a short line down from the nose and two little curves from its base, making a soft Y shape.
- Whiskers: With green, embroider two fine lines on each cheek. Secure all embroidery ends on the back.
7. Optional hanging loop
Join white at the top center between the ears. Ch 18, then sl st into the same attachment point to form a loop. Work 18 sc evenly around the chain arch, join, fasten off, and weave in the ends. This loop is optional and is not shown in the main stitch chart.
diagram
Secure all tails, especially at the clover, stem, and loop. Dampen the work lightly and shape the cheeks and ears by hand; keep the clover dimensional. This version is intended as an applique or hanging ornament. If using it as a coaster, omit the loop and keep the decorative pieces flat enough for a cup to sit securely.
Chart-reading notes
The chart uses US terms and follows the Craft Yarn Council’s crochet symbol conventions. Start at the center and work Rnds 1–5 outward; work the two ears, then the white outline, then the five green shells. The clover is shown as a separate motif. The pink lines on the chart identify the ear rows; all ear stitches are crocheted in white. The tiny arrows/numbered callouts describe construction order, not extra stitches.