V-Stitch Ripple Pattern

Welcome back, crochet enthusiasts! Today on My Crafts Ideas, we’re diving into the intricacies of the V-Stitch Ripple Pattern. This delightful pattern creates a mesmerizing wave effect, perfect for blankets, scarves, or even adventurous shawls. Let’s unravel the magic stitch by stitch.

Crocheters, gather ’round! Today, we dive into the delightful world of the V-Stitch Ripple Pattern, a classic design that combines elegance with ease. Whether you’re a seasoned crafter or just starting out, this pattern offers a satisfying rhythm and stunning results.

The V-Stitch Ripple Pattern is a beloved crochet design that combines simplicity with elegance, creating a beautiful undulating wave effect. This pattern is highly versatile and can be used to make a variety of items such as blankets, scarves, shawls, and even garments.

V-Stitch Ripple Pattern

Stitch Guide

Before we get into the nitty-gritty of the pattern, let’s familiarize ourselves with the key stitches and terms:

  • V-st (V-stitch): This consists of (dc, ch 1, dc) worked into the specified stitch or chain space.
  • Dc Dec (Double Crochet Decrease): This stitch technique combines two double crochets into one, effectively decreasing the stitch count.
  • Foundation Row Valley: Skip 2 chains, then perform a dc dec, skipping 2 chains between the two double crochets of the decrease.
  • Valley: In subsequent rows, this refers to working a dc dec in the next 2 V-stitches, skipping the dc dec of the previous row that’s between these 2 V-stitches.
  • Mountain: This involves ([dc, ch 1] 3 times, dc) in the next chain or chain 1 space.

Beginning Chain

The V-Stitch Ripple Pattern begins with a foundation chain that is a multiple of 27 chains, plus 5. For instance, you might start with 27 chains and add 5 more to that count.

When using an H hook with worsted weight yarn, each pattern repeat forms a distinctive ‘V’ shape, approximately 4 1/2 inches wide. The pattern starts with a downward slope towards a valley, resulting in rows that resemble a row of pointed Vs.

Foundation Row

To begin, work through the back ridge of the chain:

  1. Begin with (dc, ch 1, dc) into the 5th chain from the hook.
  2. (Skip 2 chains, V-stitch in next chain) 3 times, skip 2 chains, Foundation Valley.
  3. Repeat from * across to the last 12 chains.
  4. (Skip 2 chains, V-stitch in next chain) 3 times, skip 2 chains, ([dc, ch 1] 2 times, dc) in last chain.

Row 2 and Subsequent Rows

Row 2 sets the stage for the pattern repeat:

  1. Chain 4 (counts as dc and ch 1), (dc, ch 1, dc) in the first chain-1 space.
  2. V-stitch in the next three chain-1 spaces, Valley.
  3. V-stitch in the next three chain-1 spaces, Mountains, V-stitch in the next three chain-1 spaces, Valley.
  4. Repeat from * across to the last four chain-1 spaces.
  5. V-stitch in the next three chain-1 spaces, ([dc, ch 1] 2 times, dc) in the last chain-1 space.

Repeat Row 2 for the pattern until the last row.

Last Row

The final row mirrors Row 2, with adjustments made for a neat finish:

  1. Work as Row 2, but only work 1 V-stitch in the first and last chain-1 spaces of the row.

Optional Border for First Row

For those looking to add a finishing touch, consider the optional border:

  1. Turn the blanket upside down to work into the bottom of the first row.
  2. Begin with a dc dec, placing the first dc in the space of the first upside-down V-stitch and the second dc in the first chain-2 space.
  3. V-stitch in the next chain-2 space.
  4. Continue working the row as per Row 2 instructions until the last chain-2 space.
  5. End with a dc dec, placing the first dc in the next chain-2 space and the second dc in the last upside-down V-stitch of the row.

See Another Pattern Here!

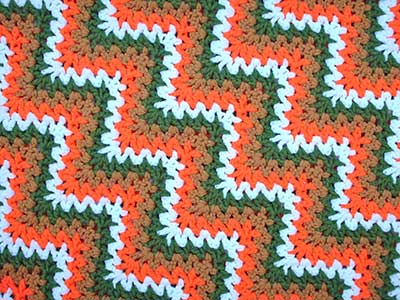
There you have it—the V-Stitch Ripple Pattern in all its glory! Whether you’re making a cozy blanket, a stylish scarf, or anything in between, this pattern is sure to impress with its elegant peaks and valleys. Remember, crochet is not just about creating beautiful items; it’s about enjoying the process and exploring new techniques. So grab your hook and yarn, and let the creativity flow!

Happy crocheting!