Welcome to My Crafts Ideas! Today, we’re diving into a fun and functional crochet project: the Granny Square Purse. This pattern is perfect for both beginners and experienced crocheters, allowing you to create a stylish accessory that’s uniquely yours.
Granny square purses are a charming blend of vintage aesthetics and modern fashion. They are versatile, customizable, and a great project for both beginners and seasoned crocheters. Here’s a detailed guide to creating your very own granny square purse.
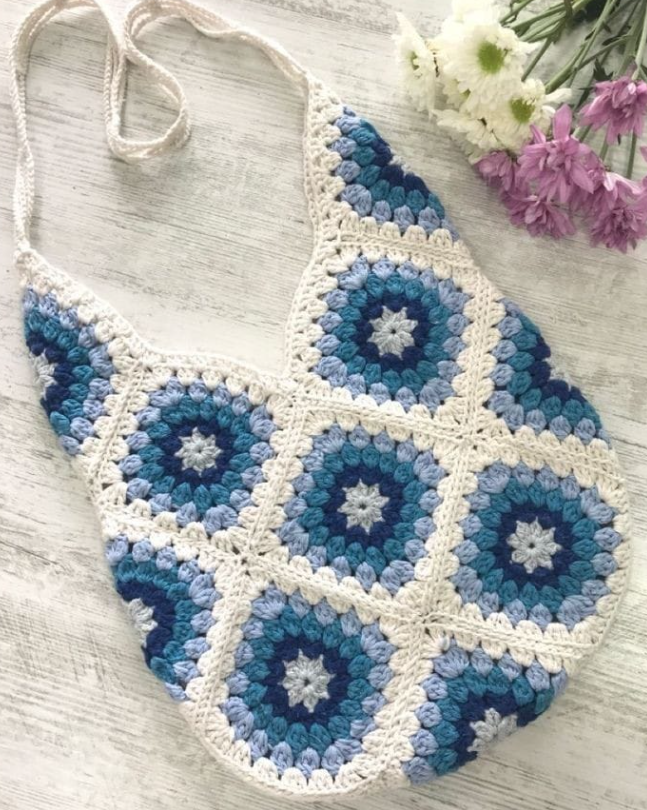
Granny Square Purse Pattern
Step-by-Step Instructions
1. Make the Granny Squares:
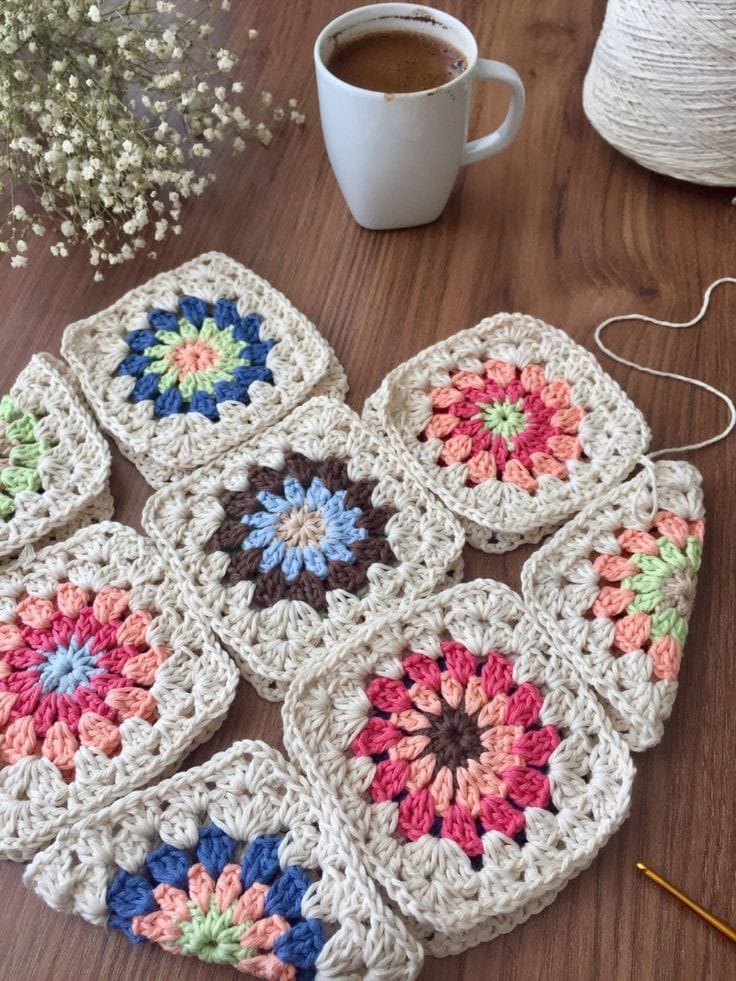
We’ll start by making thirteen granny squares. Here’s a basic granny square pattern:
Round 1: Begin with a magic circle. Chain 3 (counts as the first double crochet), then crochet 2 double crochets into the ring. Chain 2, crochet 3 double crochets into the ring. Repeat from * to * two more times. Chain 2 and join with a slip stitch to the top of the first chain-3. Pull the yarn tail to close the center. (12 double crochets and 4 chain spaces)
Round 2: Slip stitch in the next 2 stitches to get to the chain-2 space. Chain 3 (counts as the first double crochet), then crochet 2 double crochets into the same chain-2 space. Chain 1, crochet 3 double crochets, chain 2, and 3 double crochets into the next chain-2 space. Repeat from * to * around. Chain 1 and join with a slip stitch to the top of the first chain-3. (24 double crochets and 8 chain spaces)
Round 3: Slip stitch in the next 2 stitches to get to the chain-1 space. Chain 3 (counts as the first double crochet), then crochet 2 double crochets into the same chain-1 space. Chain 1, crochet 3 double crochets into the next chain-1 space, chain 1, crochet 3 double crochets, chain 2, and 3 double crochets into the next chain-2 space. Repeat from * to * around. Chain 1 and join with a slip stitch to the top of the first chain-3. (36 double crochets and 12 chain spaces)
Round 4: Slip stitch in the next 2 stitches to get to the chain-1 space. Chain 3 (counts as the first double crochet), then crochet 2 double crochets into the same chain-1 space. Chain 1, crochet 3 double crochets into the next chain-1 space. Repeat from * to * around, making 3 double crochets, chain 2, and 3 double crochets into each corner space (chain-2 space). Chain 1 and join with a slip stitch to the top of the first chain-3. (48 double crochets and 16 chain spaces)
Fasten Off: Cut the yarn, leaving a tail for weaving in. Weave in all ends.
Join the Granny Squares:
Lay out your thirteen squares in two rows of six and one row of one (which will be used for the flap).
Use a whip stitch or your preferred method to join the squares together. Start by joining the squares in each row, then join the two rows of six together to form a long rectangle. Attach the single square to one end of the rectangle to create the flap.
Create the Purse Shape:
Fold the joined squares in half, with the right sides facing each other, leaving the single square flap free. Seam the sides together, leaving the top open.
Add the Lining (Optional):
Cut a piece of fabric to fit the inside of your purse.
Sew the lining fabric to the inside of the purse using a needle and thread or a sewing machine.
5. Attach the Closure:
Sew a magnetic snap or button to the top of the purse and the flap for a secure closure.
6. Add a Handle:
Crochet a handle by chaining to your desired length and then working back across the chain with single crochets.
Attach the handle to the sides of the purse using a yarn needle and yarn.
7. Finish Up:
Weave in any remaining yarn ends.
If you added a lining, make sure it is securely sewn in place.
PDF PATTERN
📢 Exciting News! 🌟 We now offer a PDF with a beautiful Granny Square Purse pattern! 👜✨ Click the button below to access it! ⬇️📄
Granny Square Purse Pattern PDF
And there you have it—a beautiful, handmade Granny Square Purse! This project is not only practical but also allows for endless customization with different yarn colors and patterns. Share your creations with us on social media using the hashtag #MyCraftsIdeas.