Materials
- Medium-weight (#4) yarn in ivory (A), light blush pink (B), dusty rose pink (C), and muted sage green (D). Choose yarns of a similar weight and care type.
- US H/8 (5 mm) hook, or the size needed to reach the square measurement.
- Yarn needle, locking stitch markers, measuring tape, and a small kitchen scale.
The yardage depends on your yarn and tension. Complete and weigh one ivory base, one rose, and two leaves before buying for the entire blanket. Make 80 bases, 40 roses in B, 40 roses in C, and 160 leaves in D. Multiply each sample’s weight by its required quantity; allow additional ivory for seaming and the border. The border alone can require substantially more ivory than a single square, so weigh a sample border section if an exact purchase amount matters.
Gauge and dimensions
The blocked ivory square, before its appliques are attached, should measure about 5 1/2 x 5 1/2 in (14 x 14 cm). Five rounds make the square described below. If your square is another size, use the actual blocked measurement in the formula:
Blanket width = 8 x square width + 2 x border width.
Blanket length = 10 x square height + 2 x border width.
At 14 cm per square and a 4 cm border, this is 120 x 148 cm. Measure a washed and dried sample when choosing a yarn for an exact finished size.
Abbreviations and conventions
| Abbreviation |
Meaning |
| ch |
chain |
| dc |
double crochet |
| hdc |
half double crochet |
| sc |
single crochet |
| sk |
skip |
| sl st |
slip stitch |
| sp |
space |
| st(s) |
stitch(es) |
The beginning ch-3 counts as one dc. The beginning ch-1 does not count as a stitch. Unless otherwise stated, join a round with a sl st in its first counted stitch. A ch-1 space on the edge counts as one edge position when you work the next round or join squares.
Part 1: Ivory square – make 80
Round 1: With A, make a magic ring. Ch 3, work 2 dc in the ring. [Ch 2, work 3 dc in the ring] three times. Ch 2; join to the top of the beginning ch-3. Tighten the ring. Count: 12 dc and four ch-2 corner spaces; 3 dc per side.
Round 2: Sl st across the next 2 dc and into the next corner sp. In that sp work (ch 3, dc, ch 2, 2 dc). Work 1 dc in each of the next 3 dc; work (2 dc, ch 2, 2 dc) in the next corner sp. Repeat the previous side-and-corner sequence twice more. Work 1 dc in each of the last 3 dc; join. Count: 28 dc and four corner spaces; 7 dc per side.
Round 3: Sl st in the next dc and into the next corner sp. In that sp work (ch 3, dc, ch 2, 2 dc). Across the next side work: dc in each of the next 2 dc, ch 1 and sk the next dc, dc in the next dc, ch 1 and sk the next dc, dc in each of the next 2 dc. In the next corner work (2 dc, ch 2, 2 dc). Repeat this side-and-corner sequence twice more. Work the side sequence once more and join. Count: 11 edge positions per side (9 dc and two ch-1 spaces), plus four ch-2 corners.
Round 4: Sl st in the next dc and into the next corner sp. In that sp work (ch 3, dc, ch 2, 2 dc). Work 1 dc in each of the 11 edge positions on the next side, inserting the hook into a ch-1 sp whenever one occurs. In the next corner work (2 dc, ch 2, 2 dc). Repeat that side-and-corner sequence twice more. Work 1 dc in each of the last 11 positions; join. Count: 60 dc and four corner spaces; 15 dc per side.
Round 5: Sl st in the next dc and into the next corner sp. In that sp work (ch 3, dc, ch 2, 2 dc). Across the next 15 dc work: dc in each of the next 4 dc, ch 1 and sk the next dc, dc in each of the next 5 dc, ch 1 and sk the next dc, dc in each of the last 4 dc. In the next corner work (2 dc, ch 2, 2 dc). Repeat that side-and-corner sequence twice more. Work the side sequence once more, join, and fasten off. Count: 19 edge positions per side (17 dc and two ch-1 spaces), plus four ch-2 corners.
Block all the ivory bases to the same dimensions before attaching the flowers. Pin their corners and outer edges; do not stretch the corner spaces excessively.
Part 2: Rolled rose – make 80
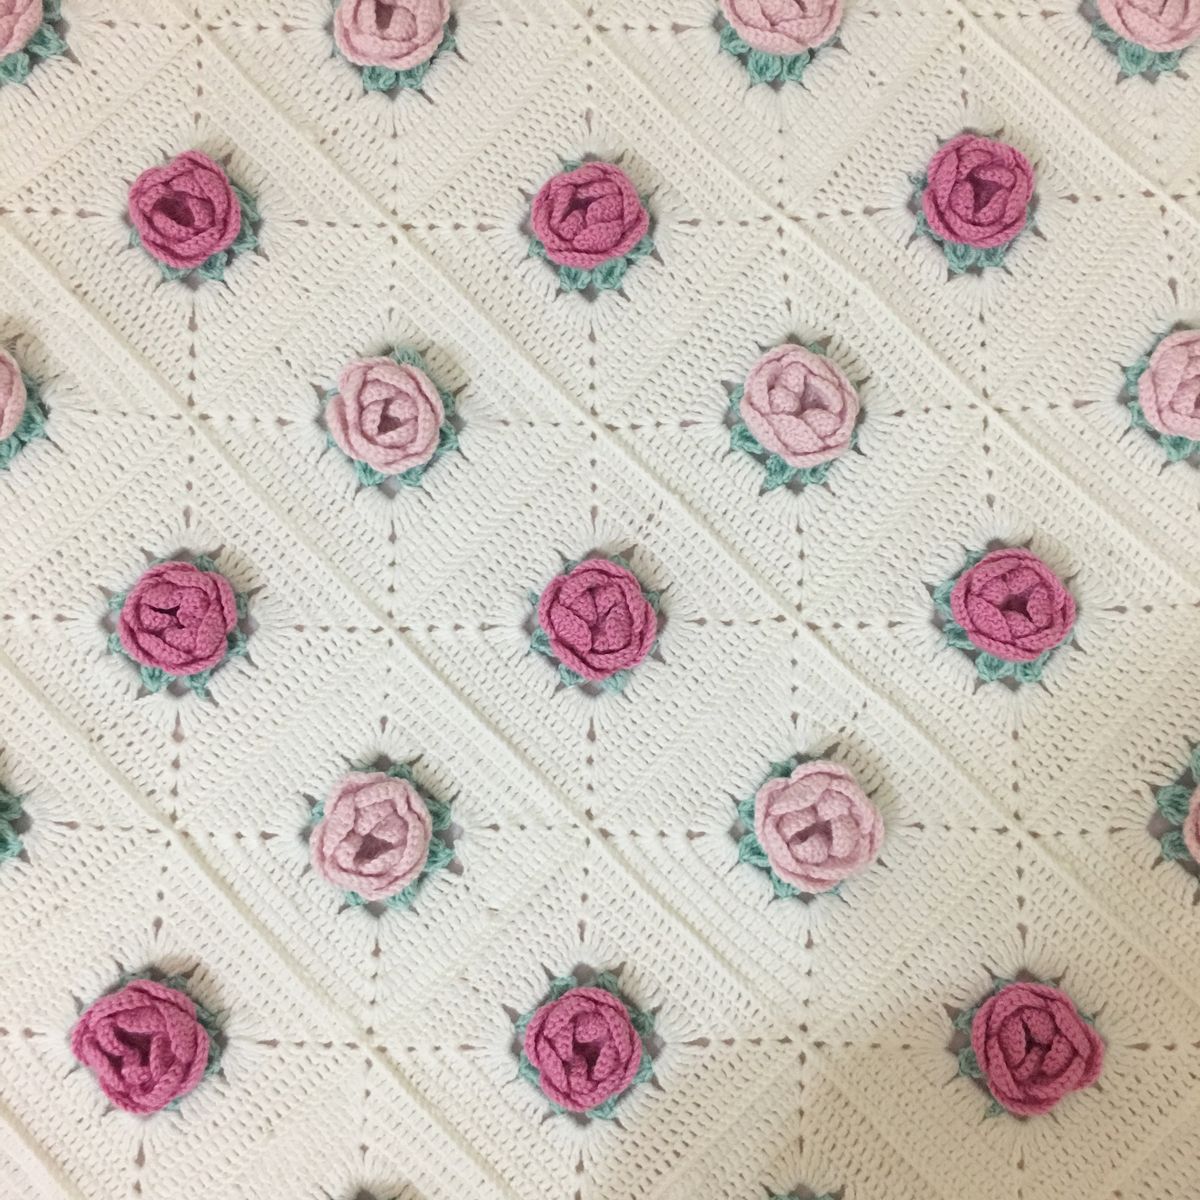
Make 40 roses with B and 40 with C. Each rose is a strip with eight petals that grow gradually larger.
Foundation: Ch 49.
Row 1: Sc in the second ch from the hook and in every remaining ch; turn. 48 sc.
Row 2: Ch 1. The following six-stitch unit uses exactly six stitches of Row 1: sc in the next st, sk the next 2 sts, work the stated number of dc in the next st, and sk the next 2 sts. Work the unit eight times, using 5 dc for units 1-3, 7 dc for units 4-6, and 9 dc for units 7-8. Fasten off, leaving a 16 in (40 cm) tail. Eight scalloped petals; all 48 base stitches used.
Starting at the small-petal end, roll the strip into a loose spiral with the straight Row 1 edge held together underneath. Use the long tail to sew through that straight edge at each turn. Shape the upper petals with your fingers. Do not pull the petals flat or sew through their outer edges.
Part 3: Sage leaf – make 160
With D, ch 9. Working from the second ch from the hook, make sc, hdc, dc in each of the next 4 chains, hdc, and sc. Ch 1; rotate around the end of the foundation chain. Along the opposite side, work sc in the opposite side of the last foundation chain used, hdc, dc in each of the next 4 chains, hdc, and sc. Join to the first sc with a sl st. Fasten off, leaving a tail for sewing. Sixteen stitches around the leaf, plus the ch-1 tip.
Make two leaves for each square. Sew their inner ends near the center of an ivory square, placing one toward the upper left and one toward the lower right. Let the tips extend beyond where the rose will sit. Sew the rose over the inner leaf ends, stitching securely through the underside of the rose and the square’s center. Weave in all tails on the wrong side.
Part 4: Arrange and join
Lay out 8 squares across and 10 squares down. Alternate B and C roses like a checkerboard: the first row begins B-C-B-C-B-C-B-C, and the next begins C-B-C-B-C-B-C-B. This uses 40 roses in each shade.
With the right sides facing up, join squares along their final-round edges with ivory yarn and a yarn needle. Use a mattress stitch: take one stitch in each matching dc edge position, and pass beneath each ch-1 edge space as one matching position. At a pair of corners, pass through both ch-2 spaces once. First assemble 10 rows of 8 squares, then sew the 10 rows together. Keep the seam as flexible as the squares; do not pull it into a tight ridge.
Part 5: Ivory border
Work around the entire joined blanket, with its right side facing you. The four corners of the whole blanket are the only corners that receive corner increases. Treat each pair of adjacent ch-2 spaces at a seam along the outside edge as two separate spaces, with 1 sc in each; these are not blanket corners.
Border Round 1: Join A at a straight outer edge. Ch 1 and sc in that edge position. Continue with 1 sc in each dc and each ch-1 sp on the outer edges. At an outer seam, work 1 sc in each of its two adjacent ch-2 spaces. At each of the blanket’s four outer corners, work (sc, ch 2, sc) in the corner ch-2 sp. Join to the first sc. Expected count: 756 sc and four corner ch-2 spaces when each seam and edge position is worked exactly as described.
Border Round 2: Ch 3 in place of the first dc. Work 1 dc in every remaining sc around. In each blanket corner ch-2 sp work (2 dc, ch 2, 2 dc). Join to the top of the beginning ch-3. 772 dc and four corner spaces.
Border Round 3: Ch 3 in place of the first dc. Work 1 dc in every remaining dc; work (2 dc, ch 2, 2 dc) in each corner sp. Join. 788 dc and four corner spaces.
Border Round 4: Repeat Round 3. 804 dc and four corner spaces.
Border Round 5: Ch 1 and sc in the same stitch. Sc in every remaining dc; work (sc, ch 2, sc) in each corner sp. Join, fasten off, and weave in the tail. 812 sc and four corner spaces.
The five border rounds are expected to measure about 4 cm with the sample yarn. If your border is narrower, repeat the dc round before the final sc round; in that case, add 16 dc to the count for each extra dc round and recalculate the final sc count accordingly.
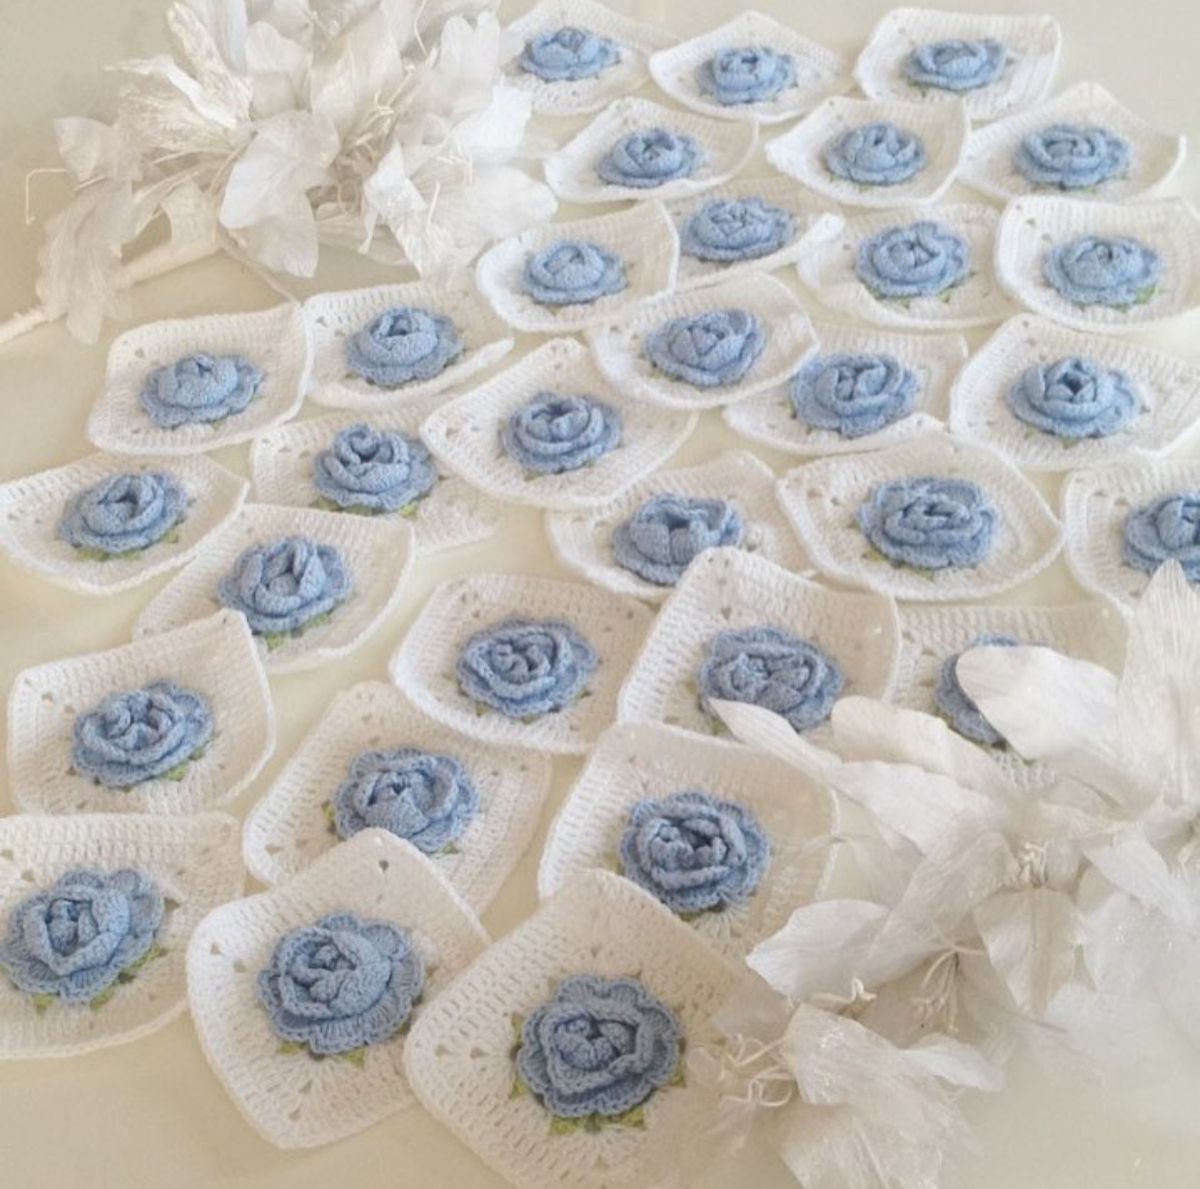
square
Finishing and care
Inspect the underside of every rose and leaf for securely woven tails. Lightly steam or wet-block the joined blanket to square the outer edges, protecting the raised petals from direct pressure. Follow your yarn label for washing. If the finished blanket will be used by an infant, inspect the sewn appliques frequently and do not leave a baby unattended with the blanket.
Design note
This is a new, independently specified blanket pattern inspired by the supplied visual reference and the general idea of a raised rose granny square. It uses separately sewn roses and leaves, so its stitch structure differs from the Loopara bag-square tutorial. The pattern counts and sizing math have been checked from the written instructions, but a physical sample has not been crocheted for this edition.
The free Pink Rose Garden Crochet Blanket PDF below includes every round and row, stitch counts for the square and border, the two-color layout, and the joining instructions. Make a sample rose square first, then you can settle into the satisfying rhythm of building the blanket one flower at a time.
Pink Rose Garden Crochet Blanket Pattern | Free PDF
Join the squares with ivory yarn using a flexible mattress stitch. Match the stitches along each outer edge, treating every chain-one opening as a single edge position. Sew eight squares into each row, then connect the rows. Keep the seams relaxed so the blanket can drape naturally.
After joining, work a five-round ivory border around the entire throw. The border begins with single crochet to tidy the outer edges, continues with double crochet for width, and finishes with a final single crochet round. The four outside corners receive increases; the places where two squares meet along a straight side do not.