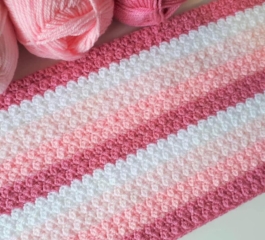
Pattern Notes
- Foundation chain: 8 × N + 4, where N is the number of horizontal repeats.
- Work Row 1 once, then repeat Rows 2-5.
- A beginning ch 1 does not count as a stitch. A beginning ch 3 counts as 1 dc.
- Row 4 starts with 6 chains: the first 3 count as a dc and the next 3 form an arch.
- Work shells into the indicated stitch, all six dc sharing that same insertion point.
- Work sc into the shell’s center ch-1 space, not into a nearby dc.
- On mesh rows, skip the unmentioned dc and chain spaces; do not add stitches between the named anchors.
- The puff includes no extra closing chain beyond the following ch-3 arch.
Foundation
Chain a multiple of 8 plus 4. For the teaching sample, ch 28 (3 horizontal repeats). The total includes 3 chains that become the first counted dc of Row 1. Before starting Row 1, place a marker in the chain closest to the hook; this marks the top of that first counted dc.
Row 1 – Half shells at both edges
Work 2 dc in the fourth chain from the hook; the 3 skipped chains count as the first dc, making a beginning half shell. Ch 1, skip the next 3 foundation chains, sc in the next chain. Repeat [ch 1, skip 3 foundation chains, shell in the next chain; ch 1, skip 3 foundation chains, sc in the next chain] until only 4 foundation chains remain. Ch 1, skip the next 3 chains, work 3 dc in the last chain. Turn.
Row 2 – Puffs between shell centers
Ch 1 (does not count as a stitch), sc in the first dc. Repeat [ch 3, puff in the next sc; ch 3, sc in the center ch-1 space of the next full shell] until all full shells have been used. Ch 3, puff in the last sc, ch 3, sc in the marked top of the beginning counted dc. On the first pass this is the marked skipped foundation chain; on later passes it is the top of Row 5’s beginning ch 3. Turn.
Row 3 – Full shells between single crochets
Ch 1 (does not count as a stitch), sc in the first sc. Repeat [ch 1, shell in the top of the next puff; ch 1, sc in the next sc] across. The last sc is worked in the final sc of Row 2. Turn.
Row 4 – Offset puffs with double-crochet edges
Ch 3 (counts as the first dc) and mark the third chain just made. Ch 3 more to form the first arch. Sc in the center ch-1 space of the first shell. Repeat [ch 3, puff in the next sc; ch 3, sc in the center ch-1 space of the next shell] until all shells have been used. Ch 3, dc in the final edge sc. Turn. Do not work puffs into the two edge sc stitches of Row 3; they support the edge dc stitches.
Row 5 – Return to half shells
Ch 3 (counts as the first dc) and mark its top. Work 2 dc in the first dc. Ch 1, sc in the next sc. Repeat [ch 1, shell in the top of the next puff; ch 1, sc in the next sc] until all puffs have been used. Ch 1, work 3 dc in the marked third chain of Row 4’s beginning six-chain edge. This marked chain is the top of the edge dc, not the top of the ch-3 arch. Turn.
Continue the Four-Row Repeat
Repeat Rows 2-5 until the fabric reaches the desired length. Row 5 recreates the arrangement of Row 1, so Row 2 can begin again. Finish after Row 2 or Row 4 if you want to add the proposed straight border; a shell row gives a more decorative open edge when left unbordered.
Complete Teaching Sample
Chain 28. Work Rows 1-5 once, repeat Rows 2-5 twice more, then work Row 2 one final time. You have 14 pattern rows, ending on a mesh row. Fasten off for an unbordered swatch, or continue with the optional border below.
| Row |
Full shells |
Half shells |
Puffs |
Single crochets |
Other edge dc |
ch-3 arches |
| 1 / 5 |
2 |
2 |
0 |
3 |
0 |
0 |
| 2 |
0 |
0 |
3 |
4 |
0 |
6 |
| 3 |
3 |
0 |
0 |
4 |
0 |
0 |
| 4 |
0 |
0 |
2 |
3 |
2 |
6 |
The dc inside full and half shells are included in those shell groups, not in the “other edge dc” column. Shell rows also have 6 connecting ch-1 spaces, plus 1 center ch-1 space per full shell.
Customize the Width and Length
Measure a washed or blocked swatch according to the yarn label. To find the horizontal repeat width, measure between two equivalent points one full repeat apart, or measure several complete repeats across the middle and divide by that number. Divide the desired project width by the width of one repeat and round to a whole number N (at least 1). Then make 8N + 4 foundation chains. Recheck the actual width after several rows; the edge treatment can affect the measurement.
| Horizontal repeats (N) |
Foundation chains |
| 3 |
28 |
| 4 |
36 |
| 5 |
44 |
| 10 |
84 |
| 20 |
164 |
For example, if your measured repeat is 2 inches wide, 5 repeats give a width of roughly 10 inches before any border; you would chain 44. This is a calculation example, not a measured gauge. Choose the length separately by measuring as you work.
For a small throw, you could choose a target of approximately 30 × 36 inches (76.2 × 91.4 cm) before the border. Calculate N from your swatch, work Row 1, and repeat Rows 2-5 until you reach approximately 36 inches, ending after Row 2 or Row 4. The target dimensions are a suggested project option, not measurements from the photograph.
Estimate Your Yarn
Make a generous swatch, measure its area, and weigh it. Estimated project weight = swatch weight × planned project area ÷ swatch area. For an optional border, include its area or make a separate border sample. Add a practical reserve, for example 15-20%, for ends and differences in tension. Convert the estimated weight to skeins using the weight on the yarn label. This is an estimate, not a tested yardage requirement.
Optional Simple Border
- Finish the stitch pattern after Row 2 or Row 4 for a mesh edge. Keep the working loop on the hook. Do not turn for the border.
- Ch 1 (does not count). Work 3 sc in the current corner stitch. Continue down the first side, placing sc evenly around row ends. Start with about 2 sc around a tall row end and 1 around a short row end; adjust if the edge waves or draws inward.
- At the bottom corner, work 3 sc in the corner foundation chain. Work 1 sc in each remaining structural foundation chain across the bottom (the 3 chains that represented the first dc are part of the side edge). Work 3 sc in the far bottom corner chain, counting that corner once.
- Work evenly up the second side. At the top corner, work 3 sc in the corner stitch. Across the top, work 3 sc in each ch-3 arch and 1 sc in each intervening sc or puff; if the last pattern row was Row 4, also work into its edge dc as needed. The current starting corner has already been worked: join to its first sc with a sl st without adding more stitches there.
- For a second border round, ch 1 and work 1 sc in each sc, with 3 sc in the middle stitch of each corner group. Join with a sl st in the first sc, fasten off, and weave in the tails. The border is a proposed finish for this version; swatch and adjust its side spacing.
Helpful Troubleshooting
The shell count changes: Confirm that shells are made only in the designated puff stitches and that you alternate the correct rows. Row 3 has one more full shell than Rows 1 and 5; that difference is intentional.
An edge grows or shrinks: Check the turning-chain markers. The last half shell of Row 5 goes into the third chain of the lower dc section of Row 4’s beginning six-chain edge, not into the upper arch.
The fabric curls or the foundation pulls tight: Check that chains and puff loops are not being tightened excessively. Try a slightly larger hook for the foundation if needed and return to the main hook for the fabric.
Download the Free PDF Pattern
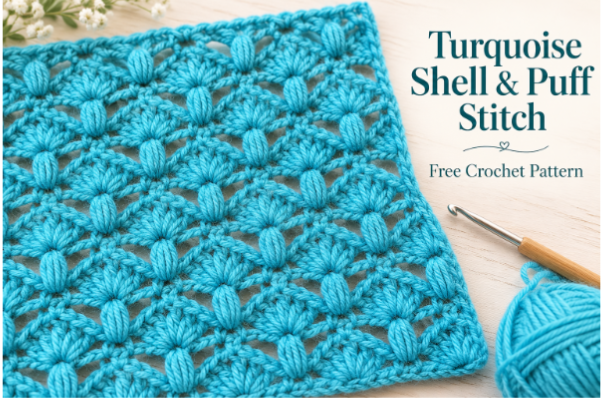
Download the printable Turquoise Shell & Puff Crochet Stitch pattern below. It includes the written rows, a placement map, count checks, sizing guidance, and the proposed border.
Weave in the ends without cinching the fabric. Wash or block according to the yarn label and let the fabric rest before measuring it. If the project is a gift, include the yarn care instructions so the recipient can look after the finished piece.
Shell and Puff Crochet Stitch PDF
This combination gives a single-color project plenty of texture. Start with the teaching sample, enjoy learning the rhythm of the four rows, and use your measured swatch to plan a piece that suits your home or wardrobe.